Tuesday, July 19, 2005

Recipe: Simple Meatloaf

Usually when we eat ground beef, it's in the form of Cathy's World Famous Burgers, which are always made from ground sirloin. And when we do burgers just for ourselves, we always have some meat left over. Well, while Cathy was away on one of her trips to Chicago, I felt the need to use up some of the little lumps of leftover ground beef that were clogging up the freezer. I surely did not want to try to emulate her burgers, so I decided to try a meatloaf. The first one was a resounding success, and subsequent attempts have been pretty close, so it appears this recipe is repeatable.

Like most things, you can make this as complex as you'd like. The original concept, and this recipe, are based on the keep it simple philosophy.

here's what you'll need . . .
ground sirloin - at least 1/3rd to 1/2 lb. (serves two, 1 small loaf pan)
1 egg
1 slice interesting bread (we use our favorite Oat Nut bread)
milk to soak bread
diced red bell pepper
diced green bell pepper
sliced black olives
sliced mushrooms
minced sliced onion
1 clove garlic, minced
Worcestershire sauce
freshly ground black pepper
SriRacha or cayenne or Tabasco or. . . (optional)

Here's how you do it.
About an hour or so before you're going to make your meatloaf, get the egg out of the refrigerator and let it warm up to room temperature. If you want your eggs to combine well with other ingredients in almost any recipe, the egg cannot be cold, right out of the refrigerator. So always try to remember (or plan far enough in advance) to allow your egg(s) to warm up.

And if your ground beef is frozen, well, you're going to need to thaw it out before you'll be able to shape it into a loaf. Use the microwave, if you've got one; or just put the meat on a plate in the refrigerator for a few hours before you start. (The safest way to slow-thaw meats is in the refrigerator. The cold helps keep down the growth of bacteria .)

When you're ready to get started, preheat the oven to about 450° F. Put the bread slice in a shallow bowl and cover it with milk. Spread a drip or five of olive oil around the inside of a small loaf pan (8x3x3").

go soak your bread

For a little loaf like this one, you'll only need a little bit of onion and peppers and such. We use a couple of thin slices of a small onion, which amounts to about ½ Tsp. or less when minced up. Similar amounts of diced green and/or red peppers are plenty. Though once proved wrong, our general approach is that there is no such thing as too much garlic, so a full clove tastes fine in our house. If you're garlic shy, try to find a smallish clove, or go ahead and waste a little excess if you must. And two mushrooms are probably enough for this sized loaf. Slice them thickly (3-4 slices per 'shroom) if you'd like noticeable nuggets of mushroom in your loaf; slice thinly, or even chop them up, if you just want the flavor. Add olives as you wish.

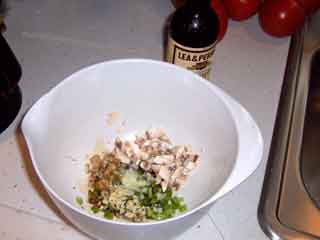
Toss all these chopped and diced and minced ingredients into the bottom of a mixing bowl. Add the meat. Give it a quick slug of Worcestershire sauce (¼ to ½ Tsp., depending on your tastes). I usually squeeze a little SriRacha in just for some extra zing, but it's certainly not necessary.

Add 6-8 grinds of black pepper, and, if you must, a pinch of salt. (Since salt tends to draw the juices out of foods, we try to reserve salt for the table; but sometimes a tiny bit during the cooking can 'improve' the flavor of the cooked food. In this case, the other flavors in the loaf are strong enough that we don't find any 'improvement' with the use of salt. But try it both ways for yourself, and go with whatever tastes best to you!)

Next, gently squeeze all the milk out of the bread slice (reserve the milk - you can use it in the gravy you'll make later!), and then crumble the bread lump onto the meat. Crack the egg on top of the pile. And have fun!

meatloaf in a bucket

The only way to get the 'proper' texture to your final meatloaf is to get into that bowl with both hands. Squeeze, and roll, and squish, and turn and churn and otherwise mix everything up. You don't want to homogenize the mixture, so a minute or two will be plenty; but you do want to thoroughly combine everything, distributing all the ingredients throughout the loaf. When you're done, roll it all up into a ball (it will probably end up about the size of a fat baseball), and toss it into the loaf pan. Pat, push, press, and pamper the ball into a nice loaf shape, leaving at least a little room between the loaf and the sides of the pan. (If you want to be totally decadent, hide a few small chunks of cheddar cheese in the middle of your loaf!)

meatloaf ready to cook

Put the pan in the preheated oven for about 5 - 6 minutes. Then turn the temperature down to about 325 - 350° F (don't forget or you'll just create a charcoal briquette!) and cook for 35-45 minutes. If you're paranoid, use a meat thermometer to check the internal temperature before you call the loaf done.

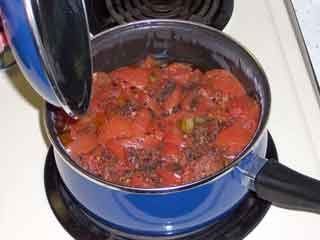
When the loaf is done, remove it from the pan and make some gravy. If you used ground sirloin, there won't be much fat in the pan, but you can always add a pat of butter or a Tbsp. of olive oil to give you enough fat to make a roux. And be sure to remember to use the milk you reserved earlier (along with vegetable and potato cooking water) as part of the liquid for your gravy. (And if gravy making is terra incognito for you, check out the instructions in the Maryland Fried Chicken recipe of Feb. 2005.)

Then slice it up and enjoy!

Sunday, July 10, 2005

Site Index

This thing has gotten big enough that searching through to find something in particular is a chore. So, herewith and henceforth, The Index (sort of alphabetically for now . . .):


Ingredients:

Ingredient: Chorizos

Ingredient: Louisiana Hot Sauce

Ingredient: Miso

Recipe/Ingredient: Poached Shrimp(s)


Recipes:

Recipe: 11 secret herbs and spices

Recipe: Barbecued Potatoes

Recipe: Beef Stew

Recipe: Bolices

Recipe: Butternut Squash

Recipe: Cajun Asian Chicken stir-fry

Recipe/Technique: Carmelized Onions

Recipe: Cathy's World Famous Garlic Bread

Recipe: Chicken Cacciatore

Recipe: Chicken Gismondo a la TJ

Recipe: Chicken Jambalaya

Recipe: Chicken with Mustard Sauce

Recipe: Chicken wrapped Chorizos

Recipe/Technique: Classic Brown Stock

Recipe: Corn O'Catherine

Recipe: Cream of Asparagus Soup with ham and potatoes

Recipe: Cream of Potato Soup

Recipe: Cream of Broccoli Soup Etc.

Recipe: Georges's Greek Green Beans

Recipe: Green Beans and Tomatoes

Recipe: Half Sour Pickles

Recipe: Maryland Fried Chicken

Recipe: Simple Meatloaf

Recipe: Mediterranean Style Seafood Soup

Recipe: Mostaccioli

Recipe: Orange Beef and Rice with Sausteamed Vegetable Medley

Recipe: Oven baked simple subs

Recipe: Paprika fried potatoes

Recipe: Split Pea Soup

Recipe/Technique: Perfect No-Lump Gravy

Recipe: Perfect Rice . . .

Recipe: Perfect Roast Beef

Recipe: Pork with Onions & Apples

Recipe: Simple Roast Chicken

Recipe: Roast Chicken Leftovers

Recipe: Rubbed pork with parsley potatoes & Brussels Sprouts

Recipe: Sautéed Filet of Sole

Recipe/Technique: New England Seafood Chowder

Recipe: Smashed Rutabagas (Turnips)

Recipe: That Shrimpy thing you do . . .

Recipe: The Maine Lobster Dinner

Recipe: The (venerable) Western Omelet

Recipe: Tommy J’s definitely not Hungarian Chicken Goulash

Recipe: Grilled Tuna & Pasta

Recipe/Technique: Veggie Fried Rice


Techniques:


Technique: Chicken on the Grill

Technique: Chopping Onions

Technique: Coring Iceberg Lettuce

Technique: Dismantling the Maine Lobster

Technique: Hard Cooked Eggs

Technique: Perfect Stovetop Popcorn

Tip/Technique: Vegetable Stock


Tips:

Tip: Tip: The Antibacterial Soap Diatribe

Tip: Cheese Graters

Tip: Choke That Blade

Tip: De String Da Celery

Tip: Frozen foods

Tip: Get the air out – of your ziplock baggies, that is . . .

Tip: Hone That Blade

Tip: Paper Towel the Produce

Tip: Pay Attention

Tip: Save the salt until the water is hot!

Tip: Surviving the Season of (winter) Tomato Horribilus...

Tip: Upend your peeler

Tip: Use Wood Cutting Boards!


Just messages:


A Short break . . .

And on some days . . .

And the outcome was . . .

Apologies . . .

Catching up . . .

Cookin' again!

Hope you had a great Thanksgiving!

It's The Holiday Hiatus

Not gone . . .

The first post . . .

The Missing Photos

The Missing Photos Return . . .

the pace of change . . .

the vagaries of online life . . .

Whaddaya mean 6 weeks . . .!?!?!


Recipe: George’s Greek Green Beans

There once was a little hole in the wall restaurant in the western suburbs of Boston where a Greek named George (Constanopolous, I think) served the best (and, for all I know, in the mid 1970s, the only) Gyros in the area. George also served the most amazing green beans I’ve ever tasted. After frequenting his establishment several times a week for almost a year, and (during the LightCraft Photo/Graphics epoch) designing his new menu and tablemats (he declined our offer to do the mural for his walls), George finally let out his secret. I don’t understand the magic involved, but the process is repeatable, and the beans are divine.

The secret is time; these beans require at least 4, and preferably 8 hours to prepare. Not that you have to do anything after you get them started, but they must cook for a long time.

here's what you'll need . . .

fresh green beans (preferably just picked)
fresh tomatoes (preferably just picked)
olive oil (the best you can afford)
salt and freshly ground black pepper (Tellicherry, of course!)

That’s it! Like I said, magic happens, but it doesn’t reside in any secret ingredients. The first time I cooked George’s beans, I didn’t believe in magic, so I tried a very small batch. The second time I cooked them and every time since, I do a week’s worth. The cooked product does not freeze well (believe me I’ve tried!), but they will last a week (or so) in the refrigerator, so plan your menus in advance to go well with these beans. That way, you can do a huge batch!

Here's how you do it.
All you need to do is wash all the veggies. Drain them and let them sit on a towel (paper if you must) till they are dry. Then, trim the stem ends off and ‘kitchen cut’ the green beans.

kitchen cut green beans

Now find a pot, for which you still have the cover, and pour some olive oil in the bottom. You want the olive oil to be about ¼ inch deep in the bottom of the pot. Toss in the beans.

beans in oil

Next, core and wedge the tomatoes and toss them in on top of the beans. Finally, grind about twice as much pepper as you think is appropriate over the top of the veggies and add a pinch or 3 of kosher salt.

green beans ready to cook

Cover and cook over very low heat for at least 4 hours (6 is better, 8 is about perfect. George used to start them at about 8am to serve with his 6pm dinners.)

green beans low

Now, a word or 3 about quantities. We find that about a pound of green beans and 4 smallish tomatoes fit comfortably in a 2 Qt saucepan, and will create 2 - 4 servings. This size needs about ¼ cup (3+ Tbsp) of olive oil, about 1/3 tsp. salt, and enough pepper to darken the surface of the pile of ingredients in the pot.

To create a week’s worth, triple all quantities (except the salt - use about ½ tsp.) and cook in a 3 Qt saucepan. If you want to make enough for the block party or the football team, get out your 18 Qt stock pot, pour about ½ inch of olive oil into it, then pour most of it it back out into a cup (now that you’ve measured it); then layer the beans and tomatoes in ‘week’s worth’ quantities into the pot. Salt and pepper each layer (you’re on your own regarding the quantities - but be careful with the salt; the acidity of the tomatoes multiplies the saltiness dramatically). Then pour the rest of the olive oil back in on top of everything; cover and cook as usual.

Very low heat means just that. If you can see steam escaping from under the cover of the pot or hear any serious bubbling with your ear close to the pot, it’s too hot; turn it down a notch. (Jeff Smith, the Frugal Gourmet, once made a comment about cooking fish - he said instead of cooking it, you should “threaten” it. The same is true of these beans. Unlike fish, the beans cook for a very long time, such that anything slightly over room temperature will work!)

On your first attempt (and any try thereafter where you have an anxiety attack), you can lift the lid of the pot after an hour to see what’s happening. Very little. Your tomatoes should be looking slightly warmish.

green beans after 1 hour

After 2 hours, steam should rise gently from the barely bubbling beans.

green beans after 2 hours

And after 3 hours, well, cookin' is goin' on . . .

green beans after 3 hours

After that, leave 'em alone (and leave the cover on the pot) until the beans are done! But when they are, be prepared to dine on Mt. Olympus.

Sunday, July 03, 2005

Recipe: Barbecued Potatoes

I never would have believed it! I figured that if you tried to ‘barbecue’ a baked potato, you’d either get a lump of charcoal, or a tooth breaking cold center, or you’d have to steam them in foil. But Nooooo . . . oh grill-breath; another possibility exists . . .

This came about because my daughter wanted steak and baked potato and the temperature was about 90 and the humidity even higher. And I was not about to run the oven (at Any temperature!) for an hour or two for Anybody. But daughters are, well, you know . . . So, what to do, what to do . . .

Duh. Parboil the suckers! But wait. That will only get the outside started; the center will still be rock hard. Hmmmmm.

Anyway, this is what evolved, and has since been repeated repeatedly!

You’ll need:
1 potato per serving
onion powder
garlic powder
paprika
Tellicherry
coarse salt
olive oil
ice

The stuff

Here’s how you do it . . .

Put your favorite teakettle on to boil, and set out a saucepan large enough to hold all your potatoes (which will be cut in half in a minute).

Scrub your potatoes clean and then slice them in half lengthwise to make the flattest pieces rather than the thickest pieces.

Slice yer spuds

Toss them cut side down into your saucepan and ‘parblanch’ them. That means pour the boiling water over the potatoes and cover the pot. Let them sit for 5 – 7 minutes. (Oh, and this would be a good time to pre-heat your grill.)

Parblanch

For two skinny little spuds, 5 minutes will be fine; for a bucket full of ½ lb. Russets, at least 7. But 7 is about the limit because by then, the water will have cooled down too much to do the ‘parblanching’ thing, and you’ll just be stewing your potatoes. If you really need to grill potatoes for a few hundred, try making two shallow slices (with your thinnest blade knife) just down either side of the center line of the cut face of each potato half. Start and stop your slit about 1” from each end. The idea is to let the boiling water get into the center of the potato as well as on its surface.

When the potatoes have had their bath, drain off the hot water and dump them into an ice bath. Just like with other vegetables, the ‘shocking’ by the ice bath stops the cooking, firms up the texture and improves the ‘look’ of your potatoes. Leave them in the ice just long enough so that when you pick one up and hold it for 30 seconds, it no longer feels ‘hot;’ vaguely warm is OK, but not ‘hot.’

Oooooh, icy!

Dry the potatoes (air, paper towels, kitchen towel . . .) and set them cut side up on a plate or three. You want plenty of space around each piece so you can get you fingers in between them without rubbing against their neighbors.

Sprinkle the cut sides lightly with the onion powder (1st), the garlic powder (2nd), then the paprika and then a few grinds of Tellicherry. Now, drizzle a tiny streamlet of olive oil down the length of each potato. Try to do a serpentine pattern rather than a straight line, but in any case, make it a very thin line. You don’t want to ‘wash off’ any of the spices.

OK, so I sloshed a little

When the oil is on, prepare to get messy (like set out a paper towel or two within easy reach, move stuff out of the way so you can get to the sink to wash your hands without spattering soap all over your food, things like that . . .)

Now ‘pat out’ the oil on the surface of each piece. You want oil to cover the entire cut surface, but you can’t rub because that will just rub off all the spices. So try to do little light ‘patty cake patty cake’ taps to spread out the oil over the spices. Don’t get obsessive, you’re about to turn the potatoes over onto the cut sides anyway; but try to leave as much of the seasoning evenly distributed under the oil as possible.

So. Turn ‘em over. Don’t slide ‘em around, just turn ‘em over and give each piece a little ‘pat down’ over its surface. Then turn ‘em face up again. The whole point of this exercise is just to get some oil and spice (the ‘excess’ from the surfaces) onto the plate so you can spread it around the skin side(s) of the potatoes.

So do it. Get your fingertips down there into the oil-spice mixture on the plate; squeeze up a pinch and spread it around. You want a nice oily coating all over the outsides of the potatoes.

Well oiled potatoes

Now wash your hands.

And after they’re dry (your hands, that is), sprinkle precisely 23 ¼ (or whatever your magic number of the moment might be) grains of coarse (Kosher) salt evenly across the surface of each potato. You don’t want to ‘salt’ the potatoes, you just want to add one more zingy component to the flavor. And, you have to wait until the potatoes are oiled to add the salt, otherwise the salt will just dissolve in the moisture of the potato and you will have simply salted your potatoes instead of making them Sing! (The coarse salt will not dissolve in the oil.)

Put ‘em on the grill

When the grill is pre-heated, turn the heat down to medium or medium-low and put the potatoes, cut side up, on the (lower) warming rack(s) of the grill. Close the cover and twiddle your thumbs for about 20 minutes. Then, turn the potatoes over, cut side down, close the cover, and keep on twiddling for another 5 – 10 minutes. Now turn the taters cut side up again, and finish the cooking – probably another 15 or 20 or 30 minutes.

Bbcue spuds, ready-to-eat

Serve ‘em up and enjoy! We’ve now done them, with steaks, ribs, chicken, and salmon, and they’ve worked well with each. But do keep the spice/oil/salt stages separate. I’ve tried 23 variations of mixing one, some, all of the spice(s) with oil and then just rubbing, rolling, soaking, dipping, the potatoes in the mixture(s) to try to simplify the process. And while some of those experiments have resulted in edible outcomes, none have matched the glory of the ‘proper’ barbecued potato. So do it ‘right,’ have some fun, and then enjoy!