Hope you're all having a Happy and a Merry and a Ho Ho Ho!
See you soon in 2005 . . .
Monday, December 27, 2004
Thursday, December 16, 2004
Recipe: Chicken wrapped Chorizos
The first few times I tried this, I had no idea what to expect, so I didn’t take any pictures. Having decided that it’s a keeper, this time I had to go and do it with Chistorra instead of Chorizos, but hey, it’s all in the family . . .
The Chistorra is a “breakfast sausage” (as it says on the package) that is slightly milder (to my taste), and slightly softer than the Chorizos. But the flavor is clearly similar, and both have worked well in this dish – a kind of ‘pigs in poultry blankets’ idea. We served it with green beans and tomatoes (see posting) and paprika fried potatoes (see posting) and a balsamic veggie vinaigrette.
here's what you'll need . . .
1 bonless skinless chicken breast per serving
1 Chorizos (or relative) per serving
flour
breadcrumbs, plain, lightly toasted
ground cumin
tarragon leaf, dried
coarse (Kosher) salt
fresh ground Tellicherry pepper
olive oil
butcher’s twine, poultry skewers, or toothpicks (sorry, duct tape will not work!)

The first step is to cook up your Chorizos, or in this case Chistorras. Get your pan hot, pour in a couple Tbsps. of olive oil, swirl til fragrance, and toss in the sausage. Turn Down The Heat. On my stove, ‘8 o’clock’ is about the right setting. You want to get the outside brown and crispy without turning the sausage into leather on the inside. I cook ‘em for about 10 minutes or so, just enough time to deal with the ‘hard part.’
The only ‘hard’ part of this dish is flattening out the chicken breasts. Well, actually, the hard part is getting an actual boneless, skinless chicken breast from your local supermarket (or at least, my local supermarket, where they generally get most of the skin off but that’s about it. But that’s another rant for another day . . .) So, back to breast beating.
I don’t have one of those neat little round, flat, hockey-puck-like pounders, but if you do, use it! Otherwise, try the flat side of your Chinese knife, the bottom of a heavy skillet, or just your bare hand. Do not use one of those pointy little hammer-like ‘tenderizer’ gizmos – you’ll just end up with chicken sludge.
Whatever the weapon of choice, flatten out your chicken breasts a bit. You’re not making paper here, but an even thickness is important so that the chicken will cook evenly. I usually try to get the thick end of the breast down to about the same thickness as the thin end – maybe about ¼” or so? And do work carefully so you can avoid tearing the chicken. I’d rather have my chicken roll not quite all the way around the sausage than have to wrap it three times around to cover the holes I tore while flattening it out!

By now, the sausage should be done, so pull it out and leave it on a plate to cool down for a while. Save the oil in the pan – you’ll be using that to cook the chicken in a few minutes!

In a small bowl or big measuring cup, or, hey whatever you can find, add about 1 Tbsp. each of flour and of breadcrumbs per serving (chicken breast). Toss in some ground cumin, some hand crushed dried tarragon leaf and some coarse salt. I’d guess about 1/3 to ½ tsp. of cumin, about ½ to 1 tsp. of tarragon, and enough salt so you can see a sprinkle of white on top of the other stuff. Then give 6 or 8 good grinds of Tellicherry over the top.
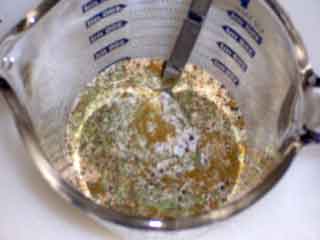
OK. Mix it up thoroughly and dump it out onto a plate or a piece of waxed paper.
Lay one now-cooled sausage, atop one chicken breast, well wait a minute. Let’s see, how to say this. Turn the chicken breasts ‘beauty side’ down. Beauty side? Well, that’s the side you’d have facing up on the plate, staring the diner in the face when you serve your creation – whatever it is. And, by the way, remember to always cook the beauty side first! Especially if you’re grilling or searing something, but even if you’re sautéing, beauty side first makes the best presentation.
So. Roll up a sausage in the middle of a chicken breast. Usually a slight angle works better than straight across or straight down the length. Use your string to tie your little package, or skewer the meeting edges of the chicken together.

Now, crank the heat back up on your stove burner, about 4 o’clock or so – but don’t put the pan on just yet.
Give each of your chicken wrapped chorizos and generous rub of olive oil and then roll them in your breading mixture. Get a good thick coating on them.
Now put the pan back on the burner. And go give your chickens another roll in the, uh, breading, and then right into the pan. If the timing was ‘right’ they should be sizzling nicely. Keep the heat up for maybe another 30 seconds, no more than 1 minute, and then turn it down – once again, about 8 o’clock on my stove.
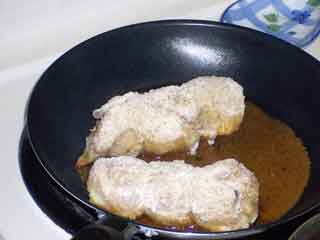
Leave ‘em alone. One of the hardest ‘lessons’ to learn in the kitchen – don’t mess with the food, give it time. After about 4 or 5 minutes, give the pan a gentle, sliding shake, just to make sure that the chicken has ‘released’ from the pan. Food will, you know. With practice, and patience, and yeah, the right temperatures, that slab of whatever sizzling and smoking and burning up on that hot pan will just suddenly, let go. If you’re there to give the pan a shake, it will stay released. Miss the shake and you’ll be needing Brillo (and a Pizza parlor nearby).
So. If the chicken released, give it another 2 or 3 minutes to develop a rich golden brown color and then roll it over. The second side will take another 10 - 15 minutes or so, and after a couple of minutes, turn the heat down a little more (half way to 9 o’clock). After a couple more, roll the chicken this way and that to get the ‘edges’ cooking also.

When they’re done, which means they’ve been on the second side at least 8 minutes to make sure the chicken is at least mostly cooked (I prefer the 'overcooked' of 12 - 15 minutes), and they’re a nice brownish color to your liking, turn ‘em out onto plates and serve up a wonderful meal!
The Chistorra is a “breakfast sausage” (as it says on the package) that is slightly milder (to my taste), and slightly softer than the Chorizos. But the flavor is clearly similar, and both have worked well in this dish – a kind of ‘pigs in poultry blankets’ idea. We served it with green beans and tomatoes (see posting) and paprika fried potatoes (see posting) and a balsamic veggie vinaigrette.
here's what you'll need . . .
1 bonless skinless chicken breast per serving
1 Chorizos (or relative) per serving
flour
breadcrumbs, plain, lightly toasted
ground cumin
tarragon leaf, dried
coarse (Kosher) salt
fresh ground Tellicherry pepper
olive oil
butcher’s twine, poultry skewers, or toothpicks (sorry, duct tape will not work!)
The first step is to cook up your Chorizos, or in this case Chistorras. Get your pan hot, pour in a couple Tbsps. of olive oil, swirl til fragrance, and toss in the sausage. Turn Down The Heat. On my stove, ‘8 o’clock’ is about the right setting. You want to get the outside brown and crispy without turning the sausage into leather on the inside. I cook ‘em for about 10 minutes or so, just enough time to deal with the ‘hard part.’
The only ‘hard’ part of this dish is flattening out the chicken breasts. Well, actually, the hard part is getting an actual boneless, skinless chicken breast from your local supermarket (or at least, my local supermarket, where they generally get most of the skin off but that’s about it. But that’s another rant for another day . . .) So, back to breast beating.
I don’t have one of those neat little round, flat, hockey-puck-like pounders, but if you do, use it! Otherwise, try the flat side of your Chinese knife, the bottom of a heavy skillet, or just your bare hand. Do not use one of those pointy little hammer-like ‘tenderizer’ gizmos – you’ll just end up with chicken sludge.
Whatever the weapon of choice, flatten out your chicken breasts a bit. You’re not making paper here, but an even thickness is important so that the chicken will cook evenly. I usually try to get the thick end of the breast down to about the same thickness as the thin end – maybe about ¼” or so? And do work carefully so you can avoid tearing the chicken. I’d rather have my chicken roll not quite all the way around the sausage than have to wrap it three times around to cover the holes I tore while flattening it out!
By now, the sausage should be done, so pull it out and leave it on a plate to cool down for a while. Save the oil in the pan – you’ll be using that to cook the chicken in a few minutes!
In a small bowl or big measuring cup, or, hey whatever you can find, add about 1 Tbsp. each of flour and of breadcrumbs per serving (chicken breast). Toss in some ground cumin, some hand crushed dried tarragon leaf and some coarse salt. I’d guess about 1/3 to ½ tsp. of cumin, about ½ to 1 tsp. of tarragon, and enough salt so you can see a sprinkle of white on top of the other stuff. Then give 6 or 8 good grinds of Tellicherry over the top.
OK. Mix it up thoroughly and dump it out onto a plate or a piece of waxed paper.
Lay one now-cooled sausage, atop one chicken breast, well wait a minute. Let’s see, how to say this. Turn the chicken breasts ‘beauty side’ down. Beauty side? Well, that’s the side you’d have facing up on the plate, staring the diner in the face when you serve your creation – whatever it is. And, by the way, remember to always cook the beauty side first! Especially if you’re grilling or searing something, but even if you’re sautéing, beauty side first makes the best presentation.
So. Roll up a sausage in the middle of a chicken breast. Usually a slight angle works better than straight across or straight down the length. Use your string to tie your little package, or skewer the meeting edges of the chicken together.
Now, crank the heat back up on your stove burner, about 4 o’clock or so – but don’t put the pan on just yet.
Give each of your chicken wrapped chorizos and generous rub of olive oil and then roll them in your breading mixture. Get a good thick coating on them.
Now put the pan back on the burner. And go give your chickens another roll in the, uh, breading, and then right into the pan. If the timing was ‘right’ they should be sizzling nicely. Keep the heat up for maybe another 30 seconds, no more than 1 minute, and then turn it down – once again, about 8 o’clock on my stove.
Leave ‘em alone. One of the hardest ‘lessons’ to learn in the kitchen – don’t mess with the food, give it time. After about 4 or 5 minutes, give the pan a gentle, sliding shake, just to make sure that the chicken has ‘released’ from the pan. Food will, you know. With practice, and patience, and yeah, the right temperatures, that slab of whatever sizzling and smoking and burning up on that hot pan will just suddenly, let go. If you’re there to give the pan a shake, it will stay released. Miss the shake and you’ll be needing Brillo (and a Pizza parlor nearby).
So. If the chicken released, give it another 2 or 3 minutes to develop a rich golden brown color and then roll it over. The second side will take another 10 - 15 minutes or so, and after a couple of minutes, turn the heat down a little more (half way to 9 o’clock). After a couple more, roll the chicken this way and that to get the ‘edges’ cooking also.
When they’re done, which means they’ve been on the second side at least 8 minutes to make sure the chicken is at least mostly cooked (I prefer the 'overcooked' of 12 - 15 minutes), and they’re a nice brownish color to your liking, turn ‘em out onto plates and serve up a wonderful meal!
Sunday, December 12, 2004
Recipe: Green Beans and Tomatoes
Here’s another in the crusade to make canned veggies a delicious and exciting addition to every meal. This is not George’s Greek Green Beans. That’s another story entirely, and one we’ll tell the next time I make a bucket of those incredible beans (so I can take some photos of the process). But for the rest of the time, this simple combination should show up on your table frequently. And with more holiday meals coming up . . .
here's what you'll need . . .
1 can kitchen cut green beans (they used to be 16 oz. cans; now they’re 14; next year 12?)
1 can whole peeled tomatoes (same story, ah well . . .)
6 whole fennel seeds
healthy pinch dried oregano
fresh ground Tellicherry pepper
splash of white wine
Here’s how you do it.
Dump the tomatoes into a saucepan. Use the blade of a spatula (or your favorite implement of destruction) to slice the whole tomatoes into pieces – at least quarters, more if you wish.

Add precisely 6 fennel seeds. (Well, that’s what I told Cathy the first time I did these, and it was probably pretty close. Now that she’s comfortable with the flavor, a little more than 6 is common!) A touch of fennel will enhance the flavor of the tomato; but if your beans taste like licorice, you used way too much.
Add the oregano. As almost always with dried herbs, crush the oregano by rolling and rubbing it between thumb and forefinger before tossing it into the pan. Once again, the idea is to enhance, not to flavor, so be judicious with your pinch. I’d guess I typically use ½ tsp. for a single-can batch like we’re describing here.

Now comes the hard part. Decision time. Do you include the packing liquid from the green beans? Or not.
Here’s the secret decoder ring: Are you making gravy?
If you’re serving these beans with anything that uses gravy (roast beef, roast fowl, roast pork, hey, Pizza if you like gravy on your pie!), then be sure to dump the entire can of beans, liquid and all into the pot! Your gravy will thank you when you drain the cooking liquid from your beans and tomatoes into your gravy-making pan!
If no gravy, then drain the liquid from the beans before tossing them in on top of the tomatoes.
But either way, toss in the beans. And grind some Tellicherry all over the top of them. (No, you don’t need to add any salt – there’s plenty in the tomatoes, and even more if you added the bean liquid!) Now spritz a small splash or two of white wine across the top to wash some of the pepper into the tomato layer (the alcohol releases some flavors in the tomatoes that would otherwise remain hidden). Finally, cover your creation and put it over barely-there-heat for at least an hour. Two is fine.
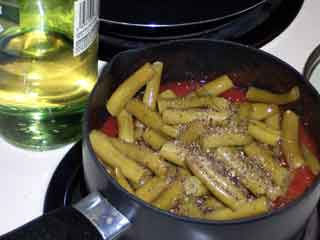
Check on the pot after 30 minutes or so. You should find a good head of steam under the lid, but no serious bubbling on the surface. This is a dish you want to warm into submission. If you’re working with a gas stove where low temperatures are hard to maintain, try a double boiler. I mean, as long as you don’t actually burn (char) the tomatoes, you’ll be fine (so if you have to do a hurry-up-batch, go for it!) But sneaking up on the beans will leave them as ‘crunchy’ as a canned bean can get. Your goal here is to meld the flavors not to ‘cook’ the vegetables.
And there you have it; magic from a couple of cans.

If you need to serve more than two or three, use two cans of beans and one of tomatoes, and maybe 12 fennel seeds . . .
It’s endlessly scalable, so just cook ‘em up and enjoy!
here's what you'll need . . .
1 can kitchen cut green beans (they used to be 16 oz. cans; now they’re 14; next year 12?)
1 can whole peeled tomatoes (same story, ah well . . .)
6 whole fennel seeds
healthy pinch dried oregano
fresh ground Tellicherry pepper
splash of white wine
Here’s how you do it.
Dump the tomatoes into a saucepan. Use the blade of a spatula (or your favorite implement of destruction) to slice the whole tomatoes into pieces – at least quarters, more if you wish.
Add precisely 6 fennel seeds. (Well, that’s what I told Cathy the first time I did these, and it was probably pretty close. Now that she’s comfortable with the flavor, a little more than 6 is common!) A touch of fennel will enhance the flavor of the tomato; but if your beans taste like licorice, you used way too much.
Add the oregano. As almost always with dried herbs, crush the oregano by rolling and rubbing it between thumb and forefinger before tossing it into the pan. Once again, the idea is to enhance, not to flavor, so be judicious with your pinch. I’d guess I typically use ½ tsp. for a single-can batch like we’re describing here.
Now comes the hard part. Decision time. Do you include the packing liquid from the green beans? Or not.
Here’s the secret decoder ring: Are you making gravy?
If you’re serving these beans with anything that uses gravy (roast beef, roast fowl, roast pork, hey, Pizza if you like gravy on your pie!), then be sure to dump the entire can of beans, liquid and all into the pot! Your gravy will thank you when you drain the cooking liquid from your beans and tomatoes into your gravy-making pan!
If no gravy, then drain the liquid from the beans before tossing them in on top of the tomatoes.
But either way, toss in the beans. And grind some Tellicherry all over the top of them. (No, you don’t need to add any salt – there’s plenty in the tomatoes, and even more if you added the bean liquid!) Now spritz a small splash or two of white wine across the top to wash some of the pepper into the tomato layer (the alcohol releases some flavors in the tomatoes that would otherwise remain hidden). Finally, cover your creation and put it over barely-there-heat for at least an hour. Two is fine.
Check on the pot after 30 minutes or so. You should find a good head of steam under the lid, but no serious bubbling on the surface. This is a dish you want to warm into submission. If you’re working with a gas stove where low temperatures are hard to maintain, try a double boiler. I mean, as long as you don’t actually burn (char) the tomatoes, you’ll be fine (so if you have to do a hurry-up-batch, go for it!) But sneaking up on the beans will leave them as ‘crunchy’ as a canned bean can get. Your goal here is to meld the flavors not to ‘cook’ the vegetables.
And there you have it; magic from a couple of cans.
If you need to serve more than two or three, use two cans of beans and one of tomatoes, and maybe 12 fennel seeds . . .
It’s endlessly scalable, so just cook ‘em up and enjoy!
Saturday, December 04, 2004
Ingredient: Chorizos
This stuff is spectacular, at least to my taste buds. A cousin in South Florida, who happens to be Cuban, introduced us to it. He made us a Cuban breakfast one time, and I’ve been trying to find the same brand of Chorizos up here in the Northeast ever since. I have found one other brand, but it just doesn’t measure up.
One day, inspiration struck. Duh! The Quijote brand is all over South Florida; we know people in South Florida; the product requires no refrigeration (until opened); and USPS parcel post is still pretty cheap . . . Hmmmmm.

Now we have Quijote brand Chorizos all the time!
I have no idea how widely this brand is available, but if you can find it, buy it. You can get it on the Net, but the shipping charges are pretty stiff. Of course, if you’ve got friends and/or relatives in Florida . . .
Cook it up in a little olive oil and use it in everything!
One day, inspiration struck. Duh! The Quijote brand is all over South Florida; we know people in South Florida; the product requires no refrigeration (until opened); and USPS parcel post is still pretty cheap . . . Hmmmmm.
Now we have Quijote brand Chorizos all the time!
I have no idea how widely this brand is available, but if you can find it, buy it. You can get it on the Net, but the shipping charges are pretty stiff. Of course, if you’ve got friends and/or relatives in Florida . . .
Cook it up in a little olive oil and use it in everything!
Wednesday, December 01, 2004
Subscribe to:
Posts (Atom)