Friday, June 22, 2007

Tip: Choke That Blade

There are a million and three ‘knife work’ tips that should get written down. I’ll try to mention them as I think of them. The other day, I cut my finger. And that reminded me that I should take my own advice now and then . . .

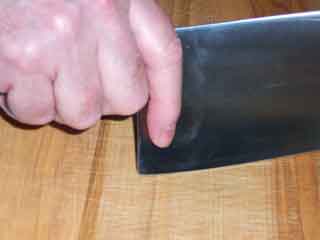
You see, I had my index finger reaching out there along the top of the knife blade, and lo and behold, there was a new ingredient dribbling out into my onions.

Don’t. You cannot get a good grip on the handle of the knife, and you cannot control the motion or direction of the blade with that finger stuck out there like that.

Don’t do this!

‘Choke up’ on the blade. Get your thumb pointing toward the knife tip on one side of the steel,

Thumb down one side

and your index finger down toward the blade edge on the other side, and grip the handle with the rest of your fingers.

Index finger down the other

If you’re using one of those wimpy ‘little’ knives, where you don’t have room to keep your index finger down the side of the blade, well, then, tuck it under the handle, in that little nook that knife makers conveniently put right there, for just that purpose.

Thumb down one side, tuck the rest

Now, you’re ready to cut. And you won’t be slipping and sliding and adding extra bits of this and that to your dish.

Yeah. I know. It feels really strange at first. But just keep at it. In a year or 12, you’ll only have to think about it when old habits rear their ugly heads and you cut your finger half off . . .

Monday, May 07, 2007

Recipe/Technique: Perfect No-Lump Gravy

A while ago, someone left a comment on the Roast Beef page asking about gravy. I put up a quick 'how to' there, but decided that since good gravy makes a meal and is so simple to do 'right' (once you learn how), gravy should have its own post.

So, for perfect no-lump gravy every time you roast a chicken, duck, turkey, other kind of bird or a hunk of beef or any other kind of meat, just remember one word: roux (pronounced 'roo').

A roux is just flour cooked in the drippings of the roast pan until it is a nice lump of goop or paste. Once flour has been turned into a roux, it can’t cause lumps in the gravy. It’s as simple as that.

For any kind of gravy, the proportions are always the same. 1 Tbsp. of pan drippings (and yes, that means fat!) plus 1 Tbsp. flour makes enough roux for 1 cup of liquid (from potatoes, vegetables, stock, or even plain water). If you don’t have any pan drippings (shame on you!) or if you need to make gravy after the fact (for leftovers, for example), you can use butter or olive oil for the fat.

Let’s use a roast chicken for the example and walk through the whole process of making perfect gravy. The steps are the same for any kind of gravy.

here's what you'll need . . .
meat juices from cooking, or butter, and/or olive oil
flour
cooking water from veggies
(Gravy Master, optional)
fresh ground black pepper, Tellicherry, of course
optional additions include sliced mushrooms, chopped giblets (cooked!), crumbled bacon bits or other cracklin's, additional herbs and/or spices (thyme, oregano, caraway, fennel, . . .), zingy bits like jalapeños, or almost any other thing you can think of that would taste good to you!

Here's how you do it.

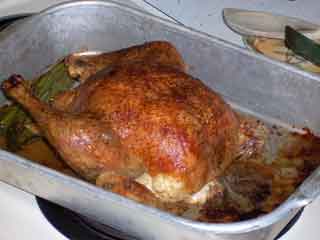
When the chicken (or other meat) is done, turn off the oven, remove the bird from the roasting pan, put it on a plate (or platter) and stick it back in the oven to keep warm.

Remove the beast . . .

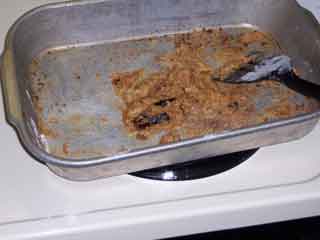
Put the roasting pan on a burner on the stove. With a spatula, scrape all the browned goodies loose from the bottom of the pan. Guesstimate the quantity of drippings (or, if you’re eternally compulsive, pour them out into a measuring cup to see how much you’ve got. Then pour it all back into the pan).

Turn the stove burner on to a medium heat setting. Sprinkle an equal amount of flour over the surface of the drippings. (You could just dump it all into the middle, but you’ll have to spend much longer mashing it around to make sure all the flour gets coated.)

Makin' the roux

Stir, chop, mix, scrape, fold and otherwise manipulate the flour, over the heat, until all the fat/liquid has been absorbed coating every last granule of flour. You should end up with a fairly dryish, yet still smooth, lump of roux that holds together in the pan. If the roux seems gooey or wet, sprinkle a little bit more flour on it; if it seems dry and flaky, add a drip more fat (olive oil is the easiest to work with unless you reserved some of the original pan drippings.) Keep chopping, stirring, mixing etc. for a while until the roux cooks for a few minutes and begins to take on the rich brown color of the pan scrapings. (4 or 5 minutes is usually about right; if it takes longer, the stove burner isn’t hot enough.)

And keep in mind, you can always make a roux in a skillet or saucepan using butter or olive oil. Same routine; same proportions; cook it until you like the color.

Roux in a skillet

When the roux is ready, pour in the liquid(s), and always include a good sized slug of white wine (or red wine, or Sherry or beer or . . .) For best results, the liquids should be hot, or at least room temperature, when added - cold water is not a good idea. Start small, adding just enough liquid to cover the bottom of the roasting pan for example. Mix it with the roux using the flat of the spatula to squish the roux into the liquid. When you’ve added enough liquid to make a smooth paste, pour in the rest. Turn the stove up to high (or medium high) and continue stirring, mashing and mixing until the gravy begins to boil gently.

Add liquids to the roux

If you have any chopped giblets or shredded neck meat or sliced mushrooms or other accoutrement you wish to add to your gravy, now is the time.

Add chopped giblets

This is also the time to adjust the seasonings for the gravy. For us, that means giving a dozen or so grinds of Tellicherry black pepper to the mixture.

Don’t be concerned if the gravy seems too thin after you’ve added all the liquids. Let it boil gently for a few minutes (10?) and it will thicken up for you. (If it gets too thick, add some more liquid!) After a few minutes of bubbling, add a few drops of Gravy Master, if you wish, to give the gravy a nice color (what’s “nice” is up to you).

Add mushrooms & cook it!

While the gravy is bubbling away (remember to stir occasionally), you should have plenty of time to mash the potatoes, serve the veggies, carve the beast and otherwise finish last minute chores before serving the feast with, of course, perfect gravy.

Thursday, April 12, 2007

Tip: Paper Towel the Produce

A while ago, we talked about getting the air out of your baggies to help your leftovers and in-progress foods last longer. This idea should probably have been mentioned then.

Certainly air is a crucial ingredient for spoiling food. The air is full of little buggers that love to eat your food and oxygen is a powerful contributor to chemical reactions. But if you really want to speed up the process, toss a little water into the mix. You’ll have slimy garbage to throw out in no time at all.

But lots of foods, particularly vegetables, need their moisture to stay fresh. So what to do, what to do. . . . Yup. Just toss a dry paper towel in the baggie with the half used veggie. It will absorb any loose liquid, but also help whatever air you’ve left in the baggie stay as humid as the veggie needs to keep fresh longer.

Paper towel the produce

And veggies aren’t the only ones to benefit. If you have to keep breads in the refrigerator, that dry paper towel can save the day. Cold things can’t hold as much moisture as warm things. So if your bread is very fresh and ‘light’ – like hot dog and hamburger rolls, for instance, it probably has a lot of moisture in it. Put that in the fridge, and all that moisture gets ‘chilled out’ making a lovely puddle in the bread wrapper. In addition, every time you take the bread out of the fridge and open it in the warm air of your kitchen, moisture will condense on the bread wrapper. When you toss the bread back in the fridge, it sits in all that water and after a day or three, you have a bag of bread soup. So, toss in a dry paper towel and save your bread, too.

Saturday, March 10, 2007

Recipe: Chicken Gismondo a la TJ

This chicken dish is guaranteed to leave your palette humming mellow airs from Tuscany while you sip a strong nutty flavored coffee after dinner. It is not really difficult to prepare, but does take some practice to get the timing down (and of course, everything must come to the table in one fell swoop). These photos show a batch of three servings. I've never been able to master more than four servings at a time (though I've tried 6, 8 and 12). Perhaps if you've got 8 burners on the stove and 16" or 20" skillets, you might be able to do it. In any case . . .

here's what you'll need . . .

boneless, skinless breast of chicken, one per serving
seasoned flour (see below)
breadcrumbs (toasted if you make your own)
grated Parmesan cheese (fine grate if you make your own; if you don't, do so!)
eggs, 1 per two servings, 2 for up to six, room temperature!
FRESH spinach, 1 ten oz. package per person (this dish will not work with canned, frozen, or otherwise mutilated spinach)
FRESH mushrooms, ½ pound per 2 servings (as above re mutilation)
FRESH lemon juice, ½ lemon per 2 servings (as above re mutilation)
ground nutmeg (fresh would be fantastic, but ordinary off-the-shelf will suffice)
butter, 1½ sticks (if you can't handle that, you can use olive oil flavored with some butter - see below. Don't use margarine; it will taste terrible.)
pasta, wide egg noodles, or your choice

Here's how you do it.

Start with the spinach. Now a 10 oz. bag may claim to serve 3, but that's simply hooey. By the time it's cooked, a 10 oz. bag of spinach yields a couple/three tablespoons of vegetable. If you want to minimize something on your plate, cut your protein serving size by half or your starch; not the vegetables!
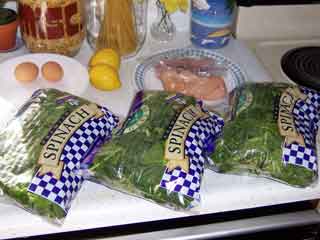
Chicken Gismondo ingredients

So, anyway, a couple hours before it's time to cook, soak the spinach in cold water. Even though the package may claim "washed," it's not. Drain and refill the water at least twice before it's time to cook.
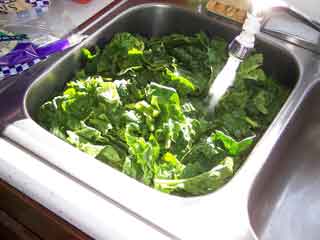
Wash that spinach!

And while the spinach is soaking, pick it over removing any scummy leaves, and all the thick stems. You want to serve this dish on a bed of spinach leaves.

Pick out the naughty bits

Sometime before you're ready to cook, slice the mushrooms (relatively thinly, you want them to cook up quickly),

Slice them shrooms

squeeze (and de-seed) the lemon juice (use a fork – a strainer eliminates all the good pulp),

Lemon squeeze!

and prepare the seasoned flour and the bread crumb mixture.

To make seasoned flour (about 1.5 Tbsp. needed per serving of chicken), spread the flour out in one pile about as big in area as all the chicken breasts. The idea is to get a level pile, not a peaked mountain. Sprinkle a little salt over the surface (think in terms of a layer of salt about 1 salt crystal deep covering the pile.)

Salty flour

Then pepper the surface of the flour until it is black - not occasional specks of black, but the whole surface is pretty black. (If you like an extra little bit of flavor in your foods, add a pinch of ground cayenne to the flour mixture – up to about 1/3 tsp. for this much flour.)
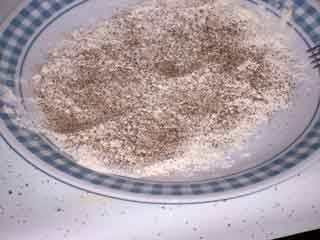
Pepper the salty flour

Mix it all together and you have seasoned flour appropriate for this recipe.

Now the flour is seasoned!

Mix the breadcrumbs

Used-to-be-bread

with the grated Parmesan cheese.

Pile on the cheese

The mixture should be about half and half, though you can adjust to taste if you must. Less cheese and the flavor tends to fade; more cheese tends to melt and burn when you sauté. Do not use the typical green can combo of Parmesan and Romano. The Romano tends to turn bitter in this recipe.
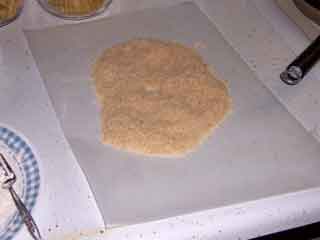
Now it's cheesy used-to-be-bread

By the way, if you’re like me, you’ll find it impossible not to end up with three times as much seasoned flour and/or breadcrumb mixture as you need. For years I cried each time I threw out an extra cup or two of either one. Then, one day, in flash of blinding insight unmatched since Galileo’s times, the solution appeared. Dump your mixtures into bowls! Pour, spoon, shimmer and shake from the bowl to the food and simply save the leftover mixtures! Only took me 30 years . . .

About 30 minutes before you want to serve, start the cooking. Put the spinach in a large covered saucepan. DO NOT add water. Just pick the spinach out of the soaking water by the handful, give it a good hard shake to remove excess water, and cram it into the pan.

Squish that spinach

You should be able to cram three or four 10 oz. pkgs. into a 4 qt. saucepan. Push it down hard enough so the lid fits tightly.

Don't you be lifting that lid

When it's time to cook the spinach, the water adhering to the leaves will provide plenty of moisture, and the tight fitting lid will keep the steam in the pan.

Start heating the pasta water.

Gently beat an egg or two with a Tbsp. or two of water till it's evenly lemon colored – no froth here, just mix it up. One egg will handle two servings, two eggs up to five, maybe six.

Lemony colored egg wash

Dredge each chicken breast in seasoned flour. If you're doing a bunch, do them in groups of three or four. You don't want the chicken to sit around coated with flour for more than a few minutes. The flour will absorb moisture from the chicken and that will mess up the rest of the coating.
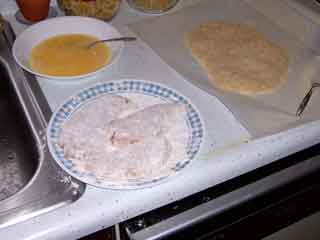
Assemble the beasts

Dip the floured chicken in the beaten eggs. Don't wash the flour off, but try to get a good coating of egg all over the chicken.

Dredge the eggy chicken in the mixture of breadcrumbs and grated Parmesan cheese. Press, push, pound, whatever to get a good even complete coating of the crumbs on the chicken. Waxed paper makes an excellent working surface for this step because you can lift and flip (gently! gently!) to get the crumbs all over, and press with the paper, reducing the goo build-up on your hands.

Toss the chicken immediately into the hot butter. (As above, you don't want to let the coated chicken sit around long.) What hot butter you ask?

Somewhere around the time you're ready to dip the chicken in the eggs, start heating a large skillet. Cut about ¾ stick of butter into little pats (so they'll melt quickly when you toss them into the pan.) Just before you're ready to sauté the first load of chicken, toss the pats of butter into the pan. They should jump and sizzle and melt instantly, but stop just short of turning brown (burned butter tastes terrible.)

Chicken Gismondo cooking

If you can't handle the butter, use olive oil. You'll need enough to cover the bottom of the skillet about 1/8" deep. Please add at least 1 Tbsp. of butter to the oil. The butter flavor is important to the overall effect of the dish. Again, be sure to get the pan good and hot before putting the oil in. Swirl the oil, then add the butter, and wait for the butter froth to subside a bit before adding the chicken.

Sauté the chicken in the butter over pretty high heat (just shy of burned butter) until golden brown. Golden brown is the color of a good pancake, or crunchy white toast. Don't worry if it tends toward brown. For this dish, it's better to err in the direction of over-browned than under-browned. Turn the chicken once. It should take about 5 minutes a side to brown it.

Chicken Gismondo browned

When you toss the chicken in, turn the spinach pan on high heat. The pasta water should be boiling, so toss in the pasta. Turn on a skillet for the mushrooms, toss another ½ stick of butter into the pan, swirl it till it melts and toss in the mushrooms. (Or use olive oil as above.)

By the time the chicken is done, everything else should be ready, too. But if not, you can keep the chicken warm in a 200° F oven for up to 10 minutes with no harm done.

To serve, drain the spinach,

Drain the spinach

toss in the remaining ¼ stick butter, the lemon juice and at least ¼ tsp. ground nutmeg. Or a little more if fresh.

Grate fresh nutmeg

More nutmeg is good to a point, but too much turns bitter. About ¼ tsp. per original 10 oz. pkg. of spinach is safe. Toss the spinach about to coat evenly with the lemon-butter-nutmeg sauce.
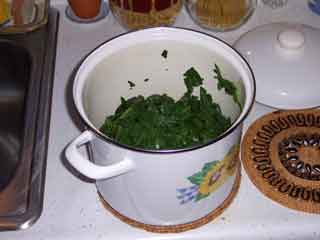
Mix with lemon butter and nutmeg

Drain the pasta. Make a ring of pasta around the edge of each plate. Fill the hole in the center with a serving of spinach. Top the spinach with a chicken breast. Slather mushrooms over it all.

Chicken Gismondo assembly

And eat immediately.

Chicken Gismondo served

Saturday, January 27, 2007

Recipe: Bolices

Bolices (bow-Lee-chase) is a chorizos stuffed Cuban pot roast kind of thing. We had dinner with Florida cousins at Gloria Estefan’s restaurant on South Beach one time, and I was introduced to this fabulous Cuban ‘special occasion’ meal. I’ve only tried to make it a few times since, so the recipe is still in a state of becoming, and the photos are limited. But that’s no reason you shouldn't start experimenting with your own version!

This is one of those 'marinate overnight and then cook for several hours' dishes, so plan ahead and leave plenty of time.

Here’s what you’ll need . . .

2 – 3 lb. eye of round
3 chorizos
3 – 6 cloves of garlic
oregano, about 1 Tbsp. dried or a couple Tbsp. fresh, or mix and match
paprika, a goodly sprinkle, maybe about ½ tsp. or so
lemon juice, at least 1 lemon, about 1/3 cup or a little more
lime juice, ½ lime should be fine
coarse (Kosher) salt
Tellicherry, of course
olive oil
onions, 1 or 2 sliced
jalapeños, pickled, 3 – 12 slices, to taste
red and green bell peppers, chopped, a couple of Tbsp., total
bay leaves, 2 or 3
beef broth, at least 2 cups or so, I use 3 – 4 Tbsp. demi glace in 3 cups of water
orange juice, about ½ cup
sherry, at least ½ cup

Here’s how you do it.

The hardest part of this dish is planning it a day ahead of time! You really want the meat to marinate overnight, if at all possible. But if not, at least get the meat into the marinade early in the morning; if you can’t let it sit for at least 4 hours, don’t bother with the dish.

I usually start by chopping the garlic and oregano together, so their flavors can meld for the time it takes to get the meat stuffed and the rest of the marinade made. You’re going to use the garlic/oregano mixture as a rub for the meat, so, chop it fairly finely, or you could mash it all together in a mortar and pestle, if you prefer. I’ve tried it both ways and am not sure I could tell a difference.

Next, I like to get the chorizos into the meat. Find your longest, skinny bladed, sharply pointed knife and use it to poke three holes through the length of the beef. The chorizos will go into these. Pick your locations so that the sausages will not bump into each other, and be careful with that knife! Remember that a knife cuts on the motion, so slice in and out a bit, don’t just try to press the knife all the way through the beef. After you get the knife through once, pull it out, rotate the blade 90 degrees and make a second cut through that same hole. I find that if I make three cuts for each hole, I can get the sausage in most easily.

After the beef is stuffed, use the tip of that knife to make shallow little slits all over the outside of the roast (don’t slit the end faces). Now, roll the roast in the garlic/oregano mixture, and rub it into the slits. When all the galic mixtures is attached to the meat, sprinkle the whole thing with paprika, a dozen grinds or so of Tellicherry, and a little bit of the coarse salt.

Now, put the seasoned meat into a zip lock bag and squeeze on the lemon and lime juices. Seal the bag, squeezing out all the air (so the marinade is in contact with the surface of the meat all the way around), and into the refrigerator overnight.

The day of the feast, remember to get the meat out of the refrigerator at least an hour, preferably two hours, before cooking time, so the meat can come up to room temperature.

While the meat is coming up to room temperature, cut up the veggies, prepare the beef broth, gather the rest of the ingredients, and dig out your Dutch oven.

Bolices veggies

Depending on the relative size of your baggie as compared to your roast, either drain the marinade into a bowl and then remove the meat, or remove the meat leaving the marinade in the baggie. You don't want to lose a drop of the marinade, nor do you want to scrape any of the coating off the meat while getting it out of the baggie.

Bolices liquid ingredients

Preheat the Dutch oven to searing and brown the meat quickly on all sides (including the end faces). Remember, if you're using a non-stick pan and an electric stove, preheat the burner before you put the pan on; when the burner is red(ish), put the pan on, turn the heat down to medium, count to no more than 22, add a splash of olive oil and toss in the meat. Non-stick coatings do not like high heat, particularly when the pan is empty!

Bolices brown the meat

When the meat is just seared/sealed on the outside, probably no more than 3 or 4 minutes, remove it from the pan and let it rest while you get the sauce started.

Bolices browned meat

Toss the veggies, including the bay leaves, into the Dutch oven and turn the heat down a little more. If you need to, add some more olive oil. Saute the veggies for 4 or 5 minutes, just until the onion is translucent and beginning to soften.

Saute the veggies

Put the meat back in the pan, add in the reserved marinade and the rest of the liquids. Or at least most of the rest. You don't want to cover the meat; but about half way up the side is fine. If you have beef broth left, save it for later!

Bolices add back meat & liquids

Crank the heat and bring the liquids just to a boil. As soon as you get to the boil, turn the heat way down, cover the Dutch oven, and let the meat slow-simmer for a couple of hours.

You can lift the lid once, after 1 hour has elapsed, just to make sure that there's still an hour's worth of liquid left in the pan. The level should still be about half way up the roast. If you need to, add some more broth, lid back on, don't touch for at least another hour.

At the end of the second hour, you know the meat is thoroughly cooked, so take it out and let it rest for at least 15 minutes, 30 would be better. While the meat relaxes, toss any remaining broth into the Dutch oven, turn the heat up to medium or so, and reduce the liquid by half to make a sauce for the meat. If you don't have any broth left, add half a cup of plain water, just to dilute the cooking liquid a bit before reducing.

To serve, cut the roast into big thick slices, at least ½ inch; ¾ or 1 inch thick slices are just fine. Pour the sauce over the meat and have a feast.

I have served this with rice and vegetables, rice and black beans, and one time, with potatoes. I put the peeled and halved potatoes into the Dutch oven after the first hour of cooking. They were great – firm, creamy texture, and delicious. But however you decide to accompany your meal, do try out bolices, and experiment, experiment, experiment!

Tuesday, January 02, 2007

Tip: Surviving the Season of (winter) Tomato Horribilus

It’s upon us again. That season when the things in the tomato bin at the supermarket (at least up here in the Northeast) bear a greater resemblance to tennis balls than divine fruit. And, in the past couple of years, even the tennis balls are getting worse. Used to be, they were just pale, mealy, and hard as a rock. Now, about half of them are actually rotten on the inside when you get them home. So, please, join the crusade: complain to your grocer, to the produce manager and the store manager at your local supermarket, to the chairman and CEO of the megamarket mothership, to Congress critters and Federal agencies and, well, you get the idea . . .

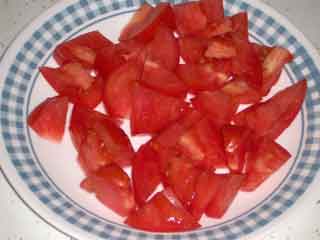
In the meantime, here’s a trick to help. About an hour before you’re going to serve that tomato, cut it up, spread it out on a plate, and salt it. (And be sure to trim off any scummy bits when you cut up your tomato, as well as get rid of any seeds that are starting to turn greenish or get dark!)

Trim & cut your tennis ball

Make sure you use a coarse (Kosher) salt. And sprinkle lightly. A few crystals per piece of tomato is all you need.

Salt lightly with coarse salt

Wait about 30 minutes and drain off the water that will accumulate on the plate. Drain again in another 30 minutes, and what you end up with is as close to a tolerable winter tomato as you’re likely to get.

The best tennis ball you can get

Remember that most fruits (yes, tomatoes are fruits) and vegetables have a lot of water in them, and the water is a major contributor to their firmness and/or stiffness. Salt, of course, has been used as a preservative for centuries because it ‘draws the water’ from foods. And that’s what you’re doing here; drawing the water from the tomato. And, in the process, tenderizing the flesh of the fruit.

You want to use coarse salt because it will dissolve much more slowly than the fine crystals of ordinary table salt, and therefore continue to draw the water, rather than season the tomato. In fact, by the end of the hour, most of the salt will have been rinsed off the tomato surface and carried away by the draining water. If what’s left is too salty for you, give the whole plate a good rinse under the cold water (and then drain it a few more times before using).

Good luck . . . Planting season is just around the corner . . . (he said with extreme optimism . . .) Until then, please check out Fiber's site, 28 Cooks.com. You've seen her comments from time to time; her food is gorgeous, and her photos even better!