Thursday, March 23, 2006

Recipe/Technique: Veggie Fried Rice

OK, so it’s not exactly culinary legerdemain, but it sure tastes good, and it’s a great way use up some of those baggies of leftover rice you’ve got lurking in the freezer!

Here’s what you need:

leftover rice
chopped up veggies
olive oil (or butter or both)
herbs & spices
maybe some liquid
Tellicherry

Here’s how you do it.

Gather up some leftover rice.

Leftover Rice

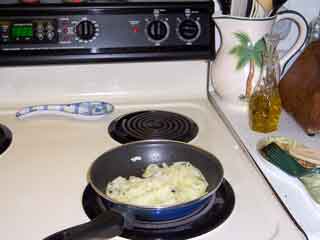
Chop up some veggies.

Veggie Fried Rice ingredients

Heat a pan. Could be a skillet or a saucepan or a dutch oven or a wok or . . . Almost anything will work. Throw in the oil. Swirl. Throw in the veggies. Stir, cook for a while.

Veggie Fried Rice veggies

Add seasonings (no, not salt – try oregano, or cilantro, or rosemary, or thyme, or basil or . . .). Throw in the rice.

Veggie Fried Rice rice

Stir. Cook for a while.

Veggie Fried Rice, so cook it a bit

Eat.

Now that you’ve got the hard part down, perhaps a comment or two. You may have noticed that the chopped veggies included some zucchini and summer squash, but the final skillet-full didn’t. Yup. Put in too much rice. Couldn’t fit the rest of the veggies. No worries. Just did them up on the side, in their own pan.

Veggie Fried Rice, the other veggies

Could’ve tossed everything together to serve, but didn’t that night. Still delicious!

Veggie Fried Rice and the forgotten treasure

Recently, I’ve done a couple of batches in a big saucepan and experimented with changing the order of cooking and adding the rice.

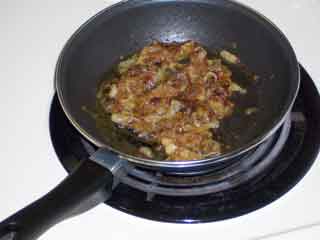
For example, start out with the pan over moderate heat, add the oil and quickly brown up some chopped onion. Turn the heat down at some point to keep the onion from burning, but do let it get crunchy brown.

Then toss in the rice and stir it all up. In all fried rice approaches, it is important to spend the time to get every kernel of rice coated with the hot oil. So take your time stirring around, turning over, moving from side to side, etc. When you’ve got a nice brown-flecked onion & rice mixture, turn the heat down a little more and let it cook for two or three minutes. You’re trying to let the rice give up the last of its trapped moisture, but to use that moisture as it escapes to tenderize the rice.

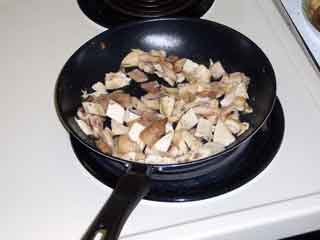
Now toss in some mushrooms and stir them around to coat with oil. Add in any long-cooking veggies, like carrots and/or green beans (fresh) and/or celery and/or bell peppers (not that bell peppers require a long time to cook, but they will hold up to it and that lets their flavors spread throughout the dish), and continue to stir around and cook until the mushrooms begin to take on some color.

When the mushrooms start to color, you know that they are about ready to ‘give up their water,’ as the saying goes. And they do contain quite a lot of liquid, which has now cooked enough to take on the delicious flavor of the mushrooms.

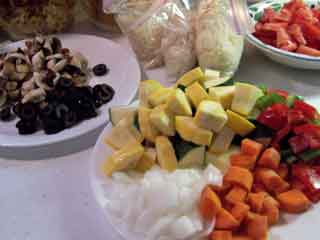
So before that liquid releases and evaporates, toss in the remaining quick cooking veggies you might be using – broccoli, summer squash, zucchini, snow peas, bean sprouts, etc. Stir around to coat, add a tiny splash of white wine, and put the lid on. In about five minutes, a 'head of steam’ will have risen under the lid, cooking the last few veggies to perfection and re-moisturizing the rice to tender delectability, and you’ll have created a masterpiece! (No, I don’t have any photos . . .)

Or . . . Start out on low heat, add your oil, and carmelize some carrots. Yup. Just like we did with the onions in the last post, only the carrots won’t take an hour – more like 15 or 20 minutes. But keep them low and slow and turn them over frequently so they don’t burn. Once they start to release their sugars, they become susceptible to burning.

About 10 minutes into the carrot time, toss in some chopped ( ½“ pieces) red and green bell peppers and let them start to carmelize also.

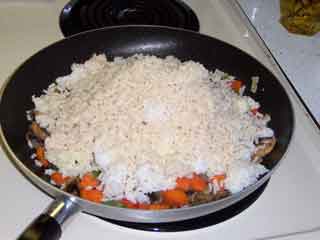
So, now you’re 20 – 25 minutes into the cooking, still low and slow. Toss in the rice and stir to coat with oil. Then add the remaining veggies (including some mushrooms, broccoli, and tomatoes!), hit the pot with a goodly splash or three of Tiparos fish sauce, a tiny splash of white wine, a goodly grind or five of Tellicherry, and slap the lid on.

Give it another 10 – 15 minutes to steam everything into submission, and, well, you’ve done it again!

Or . . .

Hey, you take it from here . . . and enjoy.

Monday, March 20, 2006

Recipe/Technique: Carmelized Onions

Most of us don’t think of onions as ‘sweet.’ Oh, we buy Texas Sweets and Sweet Yellow onions, but sweet? Nahhh. Onions are sharp, pungent, biting, give you bad breath. Well, it all depends . . . On what you do with them. Like almost all other vegetables on the planet, onions are full of complex chemicals. And when you apply heat to those chemicals, you get reactions. Things change. Sugars are created, and we call that process carmelization. Onions become most definitely sweet.

Here’s what you need . . .

onion(s), sliced
butter
pinch of coarse (Kosher) salt, optional
Tellicherry, optional
time

Here’s how you do it.

The secret to carmelization is time, and low heat. There are no shortcuts. If you can’t wait at least an hour, maybe more, do something else with your onions. I’m usually working with one onion (or less if I’m cooking for just myself), and I plan on about 90 minutes from inspiration to plate. Depending on how many onions you’re dealing with and the size of your biggest skillet, you might need up to two hours.

Now only about 60 or 70 of those minutes are on the stove. The rest are consumed with deciding how the onions are to be incorporated into the meal (or maybe, what the rest of the meal is going to be in the first place!), getting out implements, peeling and slicing an onion, finding butter, warming the skillet, and generally futzing around.

So slice an onion (or 6). I like slices about ¼” wide, but anything from hair’s breadth to half an onion will work. Because you’ll be taking your own sweet time, the size of the slice doesn’t matter to the cooking time. So slice an onion (or 6 . . . )

And heat your skillet over moderate heat for a while (no more than a minute or two, if you’re using a nonstick skillet!), toss in a tablespoon or so of butter, and swirl once or twice.

Heat the pan

Now dump in your onions

Add onions

and turn the heat down.

Turn down heat

Stir it all around to coat with butter. Then, add some more butter.

Add more butter

From here on in, it’s just a waiting game. After 3 more minutes, your butter is getting soft. After 8 minutes, it’s melted in

Butter melts

and you should turn the heat down again.

Turn down heat again

Now, just toss and stir every five or ten minutes for the rest of the hour. Here’s what you look like after 15 minutes . . .

After 15 minutes

If you’re going to add a pinch of salt and some pepper, somewhere around 20 minutes is a good time to do it. If you add the salt too early, you’ll alter the chemistry, and end up with crispy fried onions – tasty, but not carmelized. The salt draws the water out of the onion where it evaporates in the pan instead of helping to form sugars. But by 20 minutes into the process, most of the sugars have been formed and released by the onion, so your salt will have its flavor enhancing effect. And Tellicherry, well, hey I put it on ice cream . . . Here’s how your onions look after 35 minutes . . .

After 35 minutes

And after 60 . . .

After 60 minutes

I’d call ‘em done, but if you want to leave them on for a while longer, that’s fine – just turn the heat down again

Just warmin’

Whenever you decide, serve ‘em up as a side dish on their own, or pour them on potatoes, or mix them up with green beans or your veggie of choice, or top a steak or piece of grilled fish with them, or serve ‘em on toast and call it dinner!

Sunday, March 19, 2006

Recipe: Roast Chicken Leftovers

So, remember that chicken we roasted a while back? The question is, what do you do with the leftovers? Sure, you can just warm everything up again in the oven, heat the leftover gravy on the stove and repeat the original. Or you can heat up the gravy, toss in the cut up meat and serve it over toast. Or you can take it one step (or three) beyond . . .

here’s what you’ll need . . .

leftover roast chicken parts
leftover gravy (or, in a pinch, you can make fresh)
wide egg noodles
peas (fresh, canned, frozen . . .)
thyme (dried or fresh)
olive oil
sesame oil
SriRacha
coarse (Kosher) salt
ground cayenne pepper
Tellicherry

Here’s how you do it.

Carefully peel all the skin from your leftover chicken parts and cut it up into little ¼” squares. Put a small skillet over very low heat, and just coat the bottom with a drop or three of olive oil. As soon as the oil “comes to fragrance” (a state which I’m sure you’ll remember from an earlier sermon - with apologies to David Steinberg), toss in the skin bits, reduce the heat to barely there. Let the skin bits slowly render all their fat for about 30 –45 minutes, until they are nice and crispy.

About 15 minutes into the rendering time, add a sprinkle of coarse salt, and a dash of ground cayenne pepper to the skin. Swirl, toss and otherwise mix it all up. Not exactly ‘cracklins’ but a tasty sprinkle for the finished dish.

Frizzling Skin

After you get the skin going, get out a couple of saucepans - gravy in one, water in the other. Heat the gravy slowly and crank the water to a boil for the noodles. (And if you scooped all the mushrooms out of your gravy during your original roast chicken dinner, well, for heavens sake, slice up another dozen and toss them into the gravy to cook!)

While the heat does its thing, get all the remaining chicken meat off the bones and cut it up into bite size pieces.

Underway

When the water boils, toss in your noodles (all right, you can add a pinch of salt to the water if you must), and cook them just barely al dente. Usually, we cook these wide egg noodles for about 5 minutes, but for this meal, three minutes works out just right. The noodles are going to continue to tenderize over a warm burner while you get the rest of the meal together, and then cook for another minute or so at the very end. So, barely al dente to start . . .

When they’re done, drain the noodles, and toss them with a goodly squirt of sesame oil and a squeeze of SriRacha. I usually do the oil first and when the noodles are well coated, then add about an inch long ribbon of SriRacha and stir again. That way, the spicy flavor ‘rides’ the oil rather than forming little hot spots in the pasta. Finally, toss the peas on top, sprinkle with a pinch of thyme and a few goodly grinds of Tellicherry.

Noodles etc.

Now cover that pan and put it back on the still-warm burner (electric stove). If you’re working with a gas stove (or your electric cools off too quickly), you could save a little pasta water and toss it back in, or add a little water from the can of peas. Then you can leave the burner on barely there heat until it’s time to put everything together.

Next, twiddle your thumbs (or make a salad or set the table or brew the coffee or . . .) until the chicken skin crispies are done. When they’ve reached perfection, scoop them out of the skillet and onto some paper towel to drain.

Chicken Skin Crispies

Then, toss your cut up chicken meat into the skillet and heat it up for 5 minutes or so. You can put some heat under it, but you don’t really want it to cook or brown very much – that will just make it tougher.

Sizzle the Chicken

Finally, put it all together. Put the noodle pan over the still going skillet burner, dump the chicken on top of the peas, and pour some gravy over all (wet but not swimming). Using your gentlest ‘folding-in’ action combine everything. Add some more gravy (sloppy but not swimming), and stir some more.

Mix it all around

Put the cover back on the pan, turn the burner off, and finish whatever else you need to do before eating. When it’s time, divide your creation onto plates, add as much more gravy as you like,

More Gravy!

and chow down!


Dine . . .