Before you begin, understand that what you find at the supermarket, in the bin marked turnip, are usually rutabaga(s), not turnips. Rutabagas are those big, well-waxed, roundish things, with a yellowy-purplish skin. They are indeed wonderful, and should be enjoyed on all occasions. But they ain't turnips. Turnips are typically smaller (maybe softball sized), with a distinctly purple skin. When cut, a turnip is white fleshed; a rutabaga is yellow fleshed. A turnip has a sharper, more distinct flavor; a rutabaga has a duller, flatter, more subdued flavor. Both are delicious. This is about rutabagas.
Also, remember that rutabagas always take twice as long to cook as you think they should! I’m not sure why - maybe it's because I hated them as a child and they're now exacting revenge. More likely, the starches in the rutabaga just take a lot longer to break down into sugars than other starches. Who knows . . . But we love rutabagas - with roast poultry especially, and in soups and stews as well. Yes, they're a strong flavor, edging towards the bitter. But cooked just long enough, and smashed with some butter, oh, they're as sweet and rich as your heart could wish.
here's what you'll need . . .
rutabaga
salt
Tellicherry
butter
Here's how you do it.
When doing rutabaga, I always try to cut the thing in half before I try to peel it. Get your sharpest, heaviest, longest knife, or your cleaver or Chinese knife, if you have one. Set the rutabaga on your cutting board in whatever position it will sit quietly. That may be on end, if the ends are flat enough, or it may be on one side - whichever side it rolls to naturally. If you have the cleaver or Chinese knife, and are fearless using it, give the ‘baga a good whack. You might get halfway through it or so.
But head start or not, just lean down on the knife and rock it back and forth, a little bit at a time. (Remember that a knife blade cuts on motion, not on pressure; so keep the blade moving.) Sometime within the next week or so, you will succeed in cutting the thing in half. If you're using the basic chef's knife, well, try to thunk it into the 'baga at least a little way before leaning and rocking.
Whichever knife you use, do try to keep an eye on the direction of your cut - it will be nicer if you get a reasonably straight line through the veggie. With a flat side and the sharp edge of your cut, you have half a chance of something to grip while you take your peeler and remove the skin. Do peel deep enough to get all the skin off.
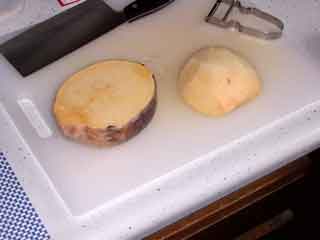
You can use your peeler to whittle off the stem ends, or wait until you've cut the half into pieces, and then trim off the tougher, darker bits at the stem ends. Once peeled, whack the hunks up into 2" pieces (or so, but bigger tends to be better than smaller, just because you're going to cook them forever). Toss 'em in a pot, cover with water, and cook 'em slowly forever. (Yes, you can add some salt, if you must.)
The ones below have been on for about 20 minutes. They’re not boiling. They’re just barely bubbling. Notice the pale yellow color.
An hour and 20 minutes later, and they’re starting to get done. See the change in color from before?
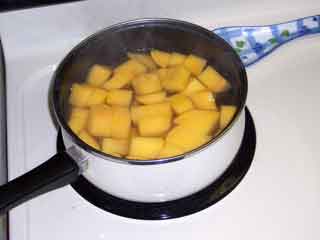
And here they are after about 2 ½ hours of cooking. These are just about done. They’ve gone from light yellow to dark yellow to an almost orange color (similar to a yam). That’s when you know they’re ready. ‘Course, you could always just, well, taste one!
Just remember, the longer they cook, the sweeter they get, and the easier they will be on your digestion, too!
When they're cooked, drain 'em, and dry 'em out for a minute or three. Throw in a hunk of butter, and smash them up with your potato masher. We like ours pretty lumpy, so it only takes a minute to smash them; if you're wimpy, you can try to get them to whipped potato consistency - but you'll never quite succeed because the texture of the basic vegetable is different from a potato. When you're done beating on them, toss 'em in a bowl, grind a little pepper on top, and chow down.
Monday, April 25, 2005
Thursday, April 07, 2005
Tip: Save the salt until the water is hot!
Look in the bottom of your saucepans. See all those little pits, particularly in the aluminum and non-stick pots? To avoid them in the future, don’t add salt to your potatoes, or vegetables, or whatever until the water comes to a boil.
Salt is sodium chloride (NaCl) and in the presence of water, the salt ‘dissociates’ into sodium and chlorine ions. When you toss a spoonful of salt into cold water, the crystals settle to the bottom of your pan and slowly begin to dissociate. Some of the chlorine latches onto passing hydrogen ions in the water, and, voila, you’ve got little tiny concentrations of hydrochloric acid around each salt crystal to etch away at the bottom of your cookware.
When the water is hot, the salt goes into solution almost immediately, all the ions are evenly distributed throughout the liquid, and you never get a concentration of acid in one spot to dig any little pits.
If you absolutely cannot remember to add the salt after the water boils, just dissolve the crystals thoroughly in little water in a glass dish or measuring cup and then throw it in the pan. But of course, the best solution of all is: don’t salt your food until after it’s cooked. Most of us get way too much salt in our diets anyway, so if you can learn to leave it out in the cooking, you’ll use a lot less and who knows, maybe even live longer!
Monday, April 04, 2005
Recipe: Mediterranean Style Seafood Soup
It's been way too long! But again, lot's of repeat meals recently. But for something different, give this one a try . . .
This dish is named Mediterranean Style Seafood Soup primarily because it's got some tomatoes in it and because it was first created the day after some Spanish rice experiments - not because it uses any inherently Mediterranean ingredients. In fact, the seafood all came out of my freezer!
See, even though we live in New England, and have a wondrous selection of fresh local seafood available almost all year, sometimes you end up with extra. A guest cancels at the last minute; an emergency takes you out of the house; the newcomer to the table turns out to be allergic to seafood . . .
For one reason or another, you've got some fresh fish that you can't use. So into the freezer it goes.
Well, a month or four later, you're sick to death of chicken and pork, and looking for something different, and there it is, as you rummage through the depths of the freezer - that leftover hunk of haddock or salmon or cod or whatever. Well, into the soup pot with it! Marvelous things can happen . . .
here's what you'll need . . .
fish, whatever's at hand; mix and match if you wish; this is a hearty soup, so 1/8 to ¼ lb. per serving will be plenty.
shrimp - you do always keep a bag in the freezer for emergencies . . .Toss in two or three per serving
scallops - but only leftovers - fresh should never be boiled!
vegetables - carrots, celery, peppers of any and every color, zucchini, summer squash, green beans, wax beans, almost anything will work, though strong flavors like broccoli, asparagus, turnip and such will very quickly dominate the soup.
tomatoes - a can or three, and add in those scummy fresh ones that aren't quite garbage, but certainly can't be put in a salad
potatoes - about ½ potato per serving
onions - about ½ for two servings and 1/8 per serving thereafter
garlic - 2 cloves for two servings, about ½ per serving thereafter
noodles - a small handful for two servings, wide egg noodles, spaghetti, ziti, penne, whatever is on hand - you just want a few floating around.
rice - a Tbsp. or two for two servings, ½ tsp. per serving thereafter - like the noodles, you just want a little bit floating around
stock - fish if you've got it (check out your local Asian market for dried Bonita flake fish stock starters!), or chicken or vegetable stock, or if all else fails use water and some chicken bullion cubes
salt and freshly ground black pepper
Tabasco or other 'controllable' hot sauce, and/or a few slices of 'pickled' jalapeno
black olives
Here's how you do it.
Cut the fish into spoon-bite sized pieces - and remember, when you eat this soup, you'll want to get more than just a piece of fish in your spoon! But also remember, if you're using flounder or sole or some other more delicate fish, you can't cut the pieces too small or they will simply dissolve.
Take a similar attitude toward all the vegetables and the potatoes; make them spoon size pieces that will let you get a piece of fish, a piece of shrimp, a noodle, a vegetable, a potato and a tomato all on your spoon!! Ahhhh, what a mouthfull. But you get the idea.
Put it all in a soup pot. Bring it to a boil. Turn the heat down and simmer for 20 minutes to 20 hours, and serve.
Or . . . Take some time with it. Sauté each of the veggies in some olive oil for a minute or two, starting with the onion, then peppers, then squashes, then etc. When each of the flavors has had a chance to build on what came before, then add in the tomatoes and simmer for a few minutes.
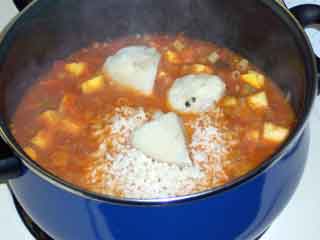
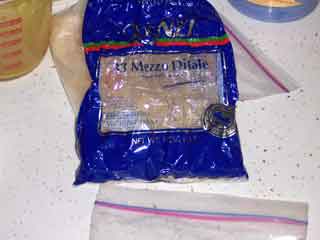
And don’t hesitate to use up the odds and ends in your pantry. I have no idea where this pasta came from, but it sure looked like the right size for some soup!
So, toss it in, along with the rice and potatoes (in this case, some old boiled ones that were in the freezer!). And again, let it simmer for a while. If you’re a ‘taster,’ now’s a good time to check for seasonings – need some more Tellicherry? How about salt? Got enough ‘zip’ from the Tabasco and/or jalapenos? Maybe add the juice from half a lemon (or even a lime, if that’s what you’ve got!) Make any adjustments and then toss in the fish.
Now give it the ’20 minutes to 20 hours’ barely there simmer and serve it up. Goes great with warm tortilla chips, and maybe some fresh tomato slices with Bleu cheese dressing or . . .
Subscribe to:
Posts (Atom)