Friday, November 19, 2004

Recipe: Pork with Onions & Apples

This began as another of those "What'll we have for dinner?" creations. The old, when in doubt go scrounge around in the refrigerator and make something up out of what you find. It was October, so we found some apples; we always have onions on hand; and the late September weather had been so lousy, we had some frozen 'country style' pork ribs that hadn't gotten barbecued. Hmmm... Dinner for two.

Since then, the basic approach has become a staple on the menu, and has been done with pork roasts, chops and cutlets, as well as ribs. They all work fine. It’s simple, quick, and just plain good.

here's what you'll need . . .
pork, chops, ribs ('country style', thick, with or without bones, cheap), cutlets, roast, . . .
Tabasco Sauce
Worcestershire sauce (Lea & Perrins, of course)
1 medium yellow onion
1 nice red, medium sized Macintosh apple (or your favorite type)
fresh ground Tellicherry
olive oil
white wine

Here's how you do it.
Though the original creation was done with some frozen ribs, this dish works much better with fresh meat – mainly because marinating will let the meat develop a layer of flavor independent of the liquid in which it’s cooked.

Pork chops etc.

Start by giving both sides of the (in this case) chops a thorough rubbing with a liberal dose of Tabasco. Not so much that you end up with a pool on the plate, but enough to give a goodly reddish coat to both sides of the meat. Then take a fork and make three or four stabs into each side of the meat. Finally, douse the chops with Worcestershire sauce. You want a complete coat on the top of each chop (spread it around if you need to), and a good-sized puddle underneath. Let the meat marinate at room temperature for at least 30 minutes (but no more than an hour), turning every 10 minutes or so.

Pork chops marinating

Meanwhile, do all the other stuff (set the table, make the coffee, feed the cat, prepare potatoes and vegetables, ...). And, chop the onion and the apple. The onion, you know how (or if not, check the earlier post).

As for the apple, well, yank the stem. Then cut it in half and cut each half in half and maybe in half again (all vertically, along the stem line). Carve out the core and the seeds from each piece and then chop them up into ½ inch or so chunks.

Coring the apple

Coat the bottom of a baking dish with a generous layer of olive oil, and toss in the meat. Pour the marinade all over, sprinkle the onions around; sprinkle the apples on top; splash a little white wine over everything; and season with copious quantities of freshly ground (coarse, of course) Tellicherry black pepper.

In the dish

Cover the baking dish with aluminum foil (crimp the edges to seal), and bake at around 350 ºF for at least 45 minutes. If you want to, you can let it go for up to 2 hours; after that you’ll have pork jerky – very tasty pork jerky, but . . .

Covered and ready to cook

We like to serve these chops (in fact, most pork dishes) with boiled potatoes and Corn O’Catherine, Apple Sauce and probably a salad. If you want, you can turn the cooking liquid into a sauce - just cook it down to half its volume and serve it on the side.

Pork chops with apple and onions

Thursday, November 18, 2004

Recipe: Corn O'Catherine

I guess we're on a keep it simple roll for the moment. So how about canned veggies? (We'll get into the whole frozen vs. canned another day.) Just because veggies start in a can is no reason they have to be dull and boring. Cathy invented this one to go with her baked pork chops, and it couldn't be simpler. But what a wonderful way to dress up a can of corn, and the plate to which it is served.

here's what you'll need . . .
1 can corn
2 -3 Tbsp. diced green bell pepper
2 -3 Tbsp. diced red bell pepper
(optional items, any or all: diced onion, sliced mushrooms, sliced black olives, chopped tomato)
fresh ground black pepper
(optional, a goodly sprinkle of ground turmeric amd/or ground cumin)
butter (a dab, a slab, whatever you dare)

Here's how you do it.
Dump the corn into a saucepan.

Corn in a bucket

Whack up the other stuff.

Other stuff whacked up

Put it in the pot.

Beef stew in a bucket

Cover. Warm gently for at least 20 minutes, or until done to your liking.

And they said cooking was tough . . .

Sunday, November 14, 2004

Tip: Frozen foods

Cook frozen or cook fresh; DON'T THAW.

The reason is simple physical chemistry. At 32º F, when water changes from liquid to solid (or solid to liquid), it expands. Since all animal and plant cells are mostly water, a gradual change in temperature allows the water to expand, breaking down the cellular structure. The result is your food turns to mush. Most commercial ("flash") freezing processes work so quickly that the expansion is minimized, and the cell damage is also minimized. But if you then thaw that frozen item before cooking, you'll allow the expansion to rupture all the cell walls, and the cooked result will be mushy.

For home freezing, the best hope is that your freezer temperature is cold enough to freeze the food quickly. Most stand-alone freezers will do the job OK. But if your freezer, like mine, is the bottom (or top) of your refrigerator, and it's packed full to begin with, chances are your 'fresh frozen' food will be suitable for soups and stews, but not for elegant entree service.

If you must thaw before cooking, use your microwave. The more quickly the water can get through the state change, the less damage will be done.

Tuesday, November 09, 2004

Recipe: Beef Stew

When I was a kid, beef stew always meant fat and gristle; I hated it. By the time I was in High school, Dinty Moore's had come along, and that I learned to like, though probably just because, like most prepared foods, it had enough salt in it to pickle an entire steer. In any case, I didn't experiment with beef stew again until well into my cooking experience. I think it was one of those 'mother of invention' deals - a camping trip with about 18 mouths to feed, including large adults and a horde of hungry kids. A bucket of stew sitting on the campfire seemed the way to go.

This is one of those 'couldn't possibly be easier' meals where the success of the dish is a function of attitude rather than culinary legerdemain. So, with only a couple of photos for reference, set your mind to 'plain, simple, natural,' and dive in . . .

here's what you'll need . . .
steak or a roast, not stew beef, about 1/3 lb per serving
carrots, at least one per serving
onion, about ½ per serving
celery, about ½ rib per serving
potatoes, at least one per serving, peeled if you must
tomatoes, one 14 oz. can per two servings or one fresh tomato per serving
turnip (or more typically, rutabaga), depends on size, two or three chunks per serving
red & green bell peppers, same as turnip two or three chunks of each per serving
mushrooms, 4 per serving
garlic (optional), one clove per lb. to flavor the meat, and/or a skewer-full to flavor the stew
green beans, wax beans, zucchini, summer squash, and/or other favorites
maybe a handful of ripe olives
white wine
water
1 or 2 bay leaves
salt
Tellicherry

Here's how you do it.
Buy a good quality roast or a steak, or three for your meat. Any cut of round will do nicely. Chuck steak will work, but only if you can find a really lean piece. Sirloins are OK, but tend to toughen up with the prolonged cooking of a stew. Tenderloins and filets will work, but it does seem a tad criminal to serve them in a stew.

Stay away from the prepackaged stew beef at your market, unless you know the butcher personally. Mostly, you'll never know what cut(s) of meat you're getting; you'll only be getting the scraps that were trimmed from something salable; it's always cut in chunks too large; and it may be several days old by the time they've got enough to shrink-wrap and put it out as stew beef. It only takes an extra few minutes for you to cut your own chunks. Invest the time.

Cut your steak into bite size chunks. Beef stew should be like Japanese food - no knife required (if a guest must cut a piece of food, the chef must commit seppuku!)

When your meat is all chunked, season it liberally with fresh ground Tellicherry. Use your fingers or the back of a spoon to gently tap the pepper into the surface of the meat, and then let it sit for 15 minutes or so before starting the cooking. Do not flour the meat!

While the meat is resting, whack up your other vegetables (except the turnip and potato, unless you want to keep them covered with cold water until it's time to toss them in - otherwise, they'll turn black and ugly!) Use the same bite-sized mindset that you held for your steak for everything in your stew, and you will be praised at the table (or log, if you're doing this over a campfire in the woods!)

So, dig out the stewpot, and get it hot. Pour a Tbsp. or two of olive oil into the hot pot (you want enough to roll around the bottom of the pan, but not enough for any 'depth'). If you wish, smash a clove of garlic with the side of your knife, remove the peel and toss the garlic into the hot oil. Move it around for a minute or so, just until it starts to brown, and then discard it. Toss in the meat. Watch out for the spits, and shake, swirl, stir, push to quickly sear the meat on all sides. You don't want to cook it, just to seal in the juices.

At this point, I like to add the mushroom chunks to the pot and cook them just long enough that they're about ready to give up their juices, about a minute - no more than two. You don't want them to actually start to give up the juices because the pan is hot enough that most of the juice will evaporate, and I like to incorporate it into the 'wholeness of the stew.' But I also like the way the mushrooms pick up some flavor from the hot pan. Or, you can just toss the mushrooms in later - you're choice, both good.

Now you need some liquid. Start with the white wine - a goodly slug into the bottom of the pan to deglaze it and cool it down a little. Give the bottom of the pan a scrape or two to loosen anything that's stuck, and swirl it all around. Let it bubble for a minute or three to cook off the alcohol.

If you're going to use fresh tomatoes, add some water now and put your tomatoes in later. But if you're using canned tomatoes, toss them in next, along with all their packing juices - liquid, you know - and stir everything around.

If you didn't do it before, cut up your potatoes and turnip. Always peel the turnip; only peel the potatoes if you must (for some unknowable aesthetic purpose). And, remember, bite size pieces . . .

Now toss everything in. If you're using any other canned vegetables (beans for example), be sure to add their packing juices as well. Add enough water to cover the contents of the pot to a depth of at least an inch - three would be better. Give a goodly grind of Tellicherry over the top surface, and add a little salt. If you've used any canned vegetables, make that a very little salt - there's already tons of it in those packing juices. Assuming you've got 4 - 6 servings of stew going, think in terms of maybe 1 tsp. of salt. Start with that in the palm of your hand and add a pinch to the pot for each potato and one pinch for all the turnip, and maybe one more pinch for the rest of the pot. If you've got any salt left, set it aside - you can add it later after you taste-test your creation.

Beef stew in a bucket

If you wish, stick a skewer-full of garlic into the liquid to flavor the pot while it cooks. How many cloves depends on your tastes (and do peel them!). And keep in mind that if you already used garlic to flavor the meat, this will amplify that flavor. Usually, I'll do one or the other but not both. And if I do the skewer thing, I'll use one clove per serving, up to six - that's plenty for any sized batch. Don't break the bay leaves, just toss them in whole - they'll be easier to find and remove when you serve your stew.

So, turn the heat down to a gentle simmer, cover and cook for about 45 minutes. Get out your spoon, scoop up a piece of potato and some broth, let it cool way down, and taste it! If need be, add some more salt and/or pepper, and remove the garlic skewer if you used it (after all, enough is enough). Cover the pot and cook some more. It should be good in another 45 minutes or so, and it will continue to be good for the next three or four hours. If you need to wait longer than four hours, turn it off now and turn it back on an hour before serving.

Beef stew ready to serve

Friday, November 05, 2004

Recipe: Sautéed Filet of Sole

Whether for a traditional Friday night supper, or a light meal anytime, sautéed filet of sole (or whatever kind of fish your local fishmonger calls 'sole') is simple and delicious.

In the U.S. true 'Dover sole' is very hard to come by and very expensive, so most of the time, you'll end up with Flounder. But don't knock flounder. It's a wonderful, delicate white fish that lends itself to poaching, baking, or, as here, sautéing. We like to serve it with Cathy's mashed potatoes, sexy peas, and a salad.

The serving size here is limited by the diameter of your skillet. The filets must fit easily, without crowding or touching each other in the pan. Otherwise, they'll fall apart when you try to turn them. And like most fish dishes, these need to be eaten as soon as they come out of the pan. Yes, it's possible to keep one batch warm in the oven while you do a second batch; but only if you're fast. After even 10 minutes in the oven (at 200º F), well, you might as well have gone out for McSea burgers.

here's what you'll need . . .

filet of sole (1/4 to 1/3 lb. per person)
lemon(s)
milk
egg(s)
flour
bread crumbs
olive oil

Here's how you do it.
If you keep your eggs in the refrigerator, get one or two out at least two hours before preparing dinner. Eggs need to be at room temperature to make a good dipping mixture (or for almost any other use, as well).

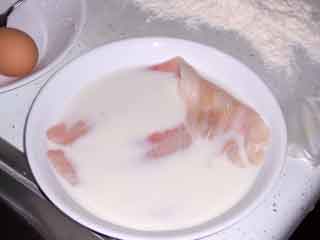
About 20 -30 minutes before you want to start cooking, get the fish out of the refrigerator and wash it gently under cold running water. Drain the water off each piece and place them all in a shallow bowl. Pour some milk over the filets (just enough to barely cover them - the milk will be discarded, so there's no point in wasting any). Let the fish soak while you get everything else ready – about 10 - 15 minutes.

Soak your sole

Spread out a couple of pieces of wax paper. Put flour on one piece, breadcrumbs on the other.

Sole coatings

Gently blend an egg with a Tbsp. of cold water until you've got a nice golden egg wash (no froth, please).

Sole egg wash

Now grab a filet from the milk, very gently 'squeegee' off any extra milk (hold the filet at one end and wipe it down between your index and middle fingers.)

Sole wipe milk

Dredge the filet in the flour, coating thoroughly on both sides. (Use the wax paper - lift one side, then the other to shake flour onto the filet. Pat gently, turn over and do the same on the other side.) Set aside each filet until you have them all floured. Try to not let them touch each other.

Sole dredge flour
Sole dredge flour 1

Now, put a large skillet on to heat up (somewhere just above medium).

Next, dip a floured filet into the egg wash (again, holding at one end, kind of drag it through on one side, then the other) until thoroughly coated.

Sole dip in egg wash
Sole dip in egg wash 2

Drain the excess egg off for a few seconds (no squeegee here),

Sole dip in egg wash 3

and then dredge the filet in the breadcrumbs (use the wax paper, as before). Set aside (separated, as before) until you have them all breaded.

Sole dredge in crumbs
Sole dredged

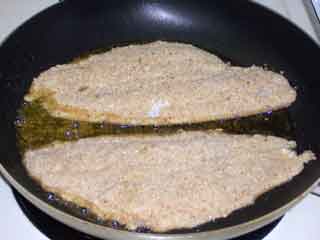
Pour a couple Tbsp. of olive oil into the hot skillet, swirl till it reaches fragrance, and gently place the filets in the pan (separated, as always). Immediately reduce the heat to something just under medium, count to 87 and then give the skillet a gentle shake or three to make sure the filets are not sticking to the bottom. Cook for about 2 minutes (or maybe 4, depends on your stove, pan, and preferences). The idea is to get the bottom side a 'crispy' light golden brown (the color of a perfect pancake).

Sole in skillet

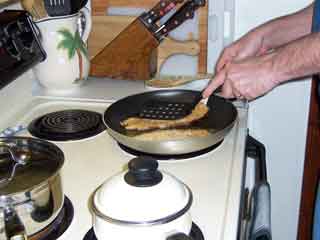
Using a long bladed spatula (long enough to hold at least ¾ the length of a filet) underneath, and another spatula (long if you've got it, but 'normal' is ok for the top one), gently turn each filet.

Sole turn 1
Sole turn 2
Sole turn 3
Sole turn 4

When you've got them all turned over, squeeze the juice from ½ a lemon all over the tops of the filets. Don't 'squirt' it, you'll just dig holes in the breading; instead, dribble it, moving your arm in a circular motion around and around over the skillet. If you wish, grind some black pepper over the now slightly dampened filets. Cook till done, probably another 2 to 4 minutes.

Serve and eat immediately.

Sole served

Wednesday, October 27, 2004

Technique: Perfect Stovetop Popcorn

Winter’s coming on. Curled up, in front of the fire, (your favorite sport/movie/show) on TV, and a big bowl of popcorn to share.

But stovetop? Yup. You ever read the ingredients on that microwave stuff?

Look, for nearly a decade while doing the 80 hour workweek thing, we used (pick your favorite brand) microwave popcorn. Toss it in, push a few buttons; 5 minutes later dump it in a bowl and back to the entertainment. What could be more bettah?

Well, how about something that doesn’t involve any of those multi-syllabic chemical names, that costs $0.99 lb. (about 273 servings!), that takes no longer to prepare, that allows you to control the amount and type of oil/fat you use, that allows you to control the amount of salt you use (if any . . .), and that's (almost) always (nearly) perfect. It’s called popcorn. You can do it!

Here’s the trick.

Put a layer of olive oil in the bottom of a saucepan. It doesn’t really matter how big your saucepan is – though 1 qt. Pans don’t really work very well – too little surface area; but if that’s all you’ve got, hey, give it a try! The idea is to coat the bottom of the pan. No more than 1/3 the height of a popcorn kernel (on its side), but more than just a glistening wipe.

Oil for popcorn

If you must measure things, generally about 2 Tbsp. Of oil will pop about 1/3 cup of popcorn – just enough for one or two snackers, barely enough for one fiend.

But if you get in the habit of using the pan as your guide, you won’t need to drag out any of those measuring implements, much less clean them up afterwards!

So. A layer of oil. Now, if you want to make it ultima-perfect, toss in a scoop of Smart Balance (or your favorite butter substitute). If you want to use real butter, you probably should use clarified butter. Clarified butter has just enough higher a smoke point to work in this scheme. Regular butter lurks on the edge of burned yukko. (Clarified? See Lobster . . .)

Add some butter substitute


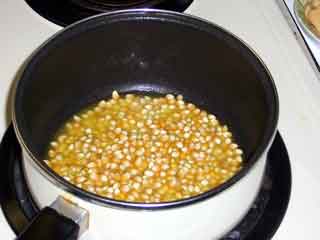
So. Oil and butter substitute in the pan. Turn the burner on to warm and wait for the butter to melt. When it has, swirl the pan to mix it all up. Now cover the bottom of the pan with popcorn, a layer 1 kernel thick, no more.

Add popcorn layer

You see, this is part of the self-measuring thing. One layer of oil, just to cover the bottom of the pan; one layer of popcorn, just to cover the bottom of the pan. No higher math, no arithmetic, no measuring implements; just pour some in, pour some more, cook . . .

OK. Cover the pot, and crank the heat to medium plus the next notch – about 4 O’clock on the dial, or whatever is the right spot on your stove. And, yes, you may have to experiment a bit to find that spot. But at about $0.05 per batch, don’t worry if you have to ruin a couple to perfect this process!

Heat it up

Now listen carefully! No, not to me, to your pan! As soon as the first kernel goes Pop! (not sizzle, not pluhhh, not pfffssssd, but Pop), take the pan off the burner and time exactly 1 minute. Leave the heat up on the burner you came from; you’ll be going back. And Do Not open the lid of the pan. Just time off exactly 60 seconds.

Rest 1 minute

Now put the pot back on the heat. Shake, rattle and roll! Or shake, swirl and jiggle, at least. Doesn’t have to be fast, just steadily. Keep the stuff in your pan in gentle motion over the heat.

In another minute or so, you’ll hear the popping begin. And it will continue, increasing in fervor for a bit and then slowing, and then nearly stopping, and then, count to 7, no more.

Pop the lid, swirl the pan,

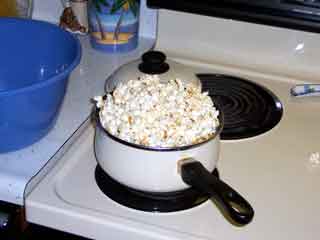
Popcorn popped

and dump the perfect popcorn into your popcorn bucket. Salt if you wish (I usually do – just table salt, the coarse stuff is too big for popcorn); a little on top, swirl and flip the bucket to distribute that shake, and then do another quick shake over ‘the new top.’

 Popcorn served

Shake, Eat, Enjoy . . .

Saturday, October 23, 2004

Technique: Dismantling the Maine Lobster

OK. You got it cooked, the lobster that is, poached, not boiled, right?! And there it is, on the plate. Now what coach? Well, you gotta take it apart. (As you do, give a moment’s thought to the first person on the planet who ever did the deed. What do you suppose inspired someone to dive to the ocean bottom, in freezing cold water, grab one of these monstrous looking creatures, cook it and tear it apart to eat? I do wonder . . .)

One item often missing from the lobster table, but a real necessity, is the ‘detritus bowl.’ That’s the elegant blue plastic bucket you’ll notice in the background of the photo. Be sure to have one available . . .

Lobster served

If your plate has hot water all over the bottom, tip it into the detritus bowl. And then hold your lobster head down over the bowl for a minute. When the water (if any) stops draining, you’re ready to take this thing apart.

I like to start with the large claws. Turn your beast on its back.

Lobster on back

Hold the body, grab the large claw leg joint closest to the body and give it a twist.
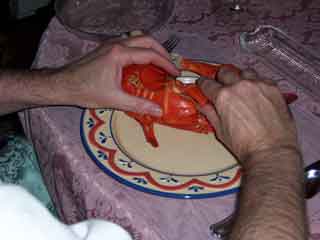
Grip large claw

If it doesn’t come right off, give it a twist in the other direction, or twist back and forth a couple of times. It will come off.
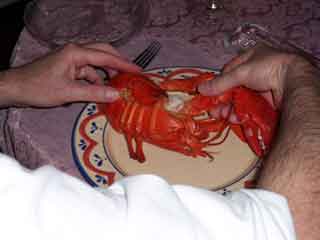
 Remove large claw

Hold it horizontally until you’re over the bowl and then hold it claw up for a bit to drain water. Do the same with the other one.

After the large claws are off, twist off each of the little claws. Again, just grab the joint closest to the body and give a twist (or three).

Remove small claws

The little ones seldom have much water in them, so you don’t need to take the time to drain them. Just pile the little guys next to the big ones.

Lobster claws removed

Now at this point, you have a difficult decision to make. Right now, all your lobster parts are still hot. If you dismantle the rest of the beast and remove all the meat before you start eating, everything will be cold when you get it in your mouth.

But if you remove meat and eat as you go along, you’ll be constantly switching gears between wrecking crew, surgeon and gastronome, your hands will be a mess throughout the entire meal, and by the time you get to the tail, it will probably still be cold.

Me, I always get all the meat on my plate first (and as fast as I am able) so I can concentrate on the eating part for the rest of the meal. You can make your own choice.

OK. All claws are off and the big ones have been partially drained. Some argue that since the tail will stay warm as long as it’s attached to the body, but the claws are already cooling off, that you should take the claws apart and get that meat soaking in the butter before tackling the tail. I prefer to take it all apart first.

So, over the bowl, grab the tail in one hand, the body in the other, do the old bend and twist a time or three.

Lobster remove tail

When the tail comes off, tip it to drain, and drop the body into the bowl.
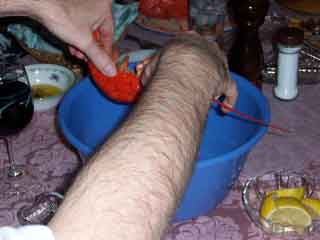
Lobster drain tail

OK, OK, no hate mail, please. I know. There’s enough meat in the body to feed a family of four, or fourteen, depending on which old Yankee you listen to. I’m sure there is. I’ve never had the patience to dig it all out. If you do, feel free. But I’d recommend you save that task until you’ve finished eating the easy parts!

Now. Depending on the time of the year, the phase of the moon, the gender of your lobster, and probably nine other factors I know nothing about, you may, or may not, see some green ‘tamale’ and/or red ‘coral’ sticking out from the tail of your beast.
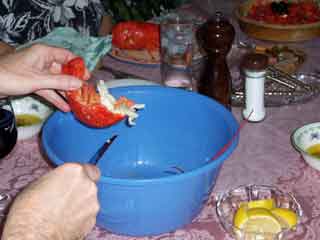
Lobster tamale and coral

Yes, they are both edible. And many people consider them great delicacies. I don’t like the way either one tastes, so I scrape them both off into the bowl.

Remove tamale and coral

Next, split the tail. Just grab it on both sides, hooking your thumbs on the fins, and bend outwards.
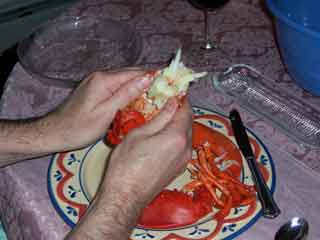
Split tail

Keep applying pressure until you feel the shell start to split. If the whole tail spilts, then you’re done. Otherwise, move your grip down a little toward the tail fins and bend again. By that time, the tail meat should be easily visible.

Lobster tail meat

Then, just grab on and tug. Boit. Out comes the entire lobster tail.
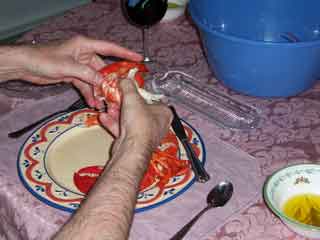
Tail meat removed

But you’re not done with that tail shell yet! See those little flipper fins at the end? Each one has a delicious little morsel of wondrously tender and tasty meat hidden inside. So bend off each one, drain it over the bowl, and put it on your plate.

Lobster tail fins removed

Now. To ‘undo’ a claw, hold it over the detritus bowl, claw down, and bend up the ‘thumb’ part – that’s the smaller of the two pincers. If necessary, give it a nudge side to side as well as up and down.

Bend up small pincer

When it snaps off, expect a gush of water to drain out of the leg and claw. Set the little one on your plate, and still over the detritus bowl, bend the rest of the claw free of the leg. Give both the claw and the leg a shake or two to get the last of the water out

Drain claw

At this point you may or may not need a claw cracker. Lobsters shed their shells when they outgrow them. The new shells are soft; the old shells are hard. If the shell is hard, you’ll hurt your hand and probably cut yourself trying to break the shell without a cracker. If the shell is soft, just grab the large claw and snap the pincer end off.

Snap off pincer

Because the lobster hasn’t had time to ‘grow into’ its new shell, the shell will separate easily from the meat. Drop the shell, tug the meat, and onto the plate.

Lobster claw meat removed

To get the meat out of the leg joints, you may want to use a ‘lobster pick.’ But if you don’t have one handy, fingers, fork tines, knife points, toothpicks, or . . . will do just as well. Dig in, one end then the other. Pull (gently, gently . . .), push, wiggle and jiggle.

Pick leg meat

The meat will plop onto your plate.

Leg meat removed

Do the other claw the same way, and you’re ready to eat.

Cut the meat and toss it into the butter bowl. Or cut it and leave it on your plate for individual bite dunking. Salt it (very, very lightly), douse it with lemon juice, dip it or drown it in butter, or olive oil, or flavored oil, or simply eat it as it is. You will enjoy . . .