Wednesday, October 27, 2004

Technique: Perfect Stovetop Popcorn

Winter’s coming on. Curled up, in front of the fire, (your favorite sport/movie/show) on TV, and a big bowl of popcorn to share.

But stovetop? Yup. You ever read the ingredients on that microwave stuff?

Look, for nearly a decade while doing the 80 hour workweek thing, we used (pick your favorite brand) microwave popcorn. Toss it in, push a few buttons; 5 minutes later dump it in a bowl and back to the entertainment. What could be more bettah?

Well, how about something that doesn’t involve any of those multi-syllabic chemical names, that costs $0.99 lb. (about 273 servings!), that takes no longer to prepare, that allows you to control the amount and type of oil/fat you use, that allows you to control the amount of salt you use (if any . . .), and that's (almost) always (nearly) perfect. It’s called popcorn. You can do it!

Here’s the trick.

Put a layer of olive oil in the bottom of a saucepan. It doesn’t really matter how big your saucepan is – though 1 qt. Pans don’t really work very well – too little surface area; but if that’s all you’ve got, hey, give it a try! The idea is to coat the bottom of the pan. No more than 1/3 the height of a popcorn kernel (on its side), but more than just a glistening wipe.

Oil for popcorn

If you must measure things, generally about 2 Tbsp. Of oil will pop about 1/3 cup of popcorn – just enough for one or two snackers, barely enough for one fiend.

But if you get in the habit of using the pan as your guide, you won’t need to drag out any of those measuring implements, much less clean them up afterwards!

So. A layer of oil. Now, if you want to make it ultima-perfect, toss in a scoop of Smart Balance (or your favorite butter substitute). If you want to use real butter, you probably should use clarified butter. Clarified butter has just enough higher a smoke point to work in this scheme. Regular butter lurks on the edge of burned yukko. (Clarified? See Lobster . . .)

Add some butter substitute


So. Oil and butter substitute in the pan. Turn the burner on to warm and wait for the butter to melt. When it has, swirl the pan to mix it all up. Now cover the bottom of the pan with popcorn, a layer 1 kernel thick, no more.
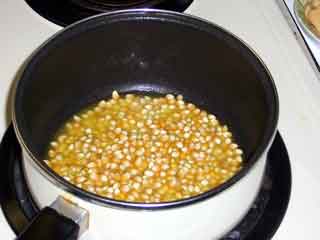
Add popcorn layer

You see, this is part of the self-measuring thing. One layer of oil, just to cover the bottom of the pan; one layer of popcorn, just to cover the bottom of the pan. No higher math, no arithmetic, no measuring implements; just pour some in, pour some more, cook . . .

OK. Cover the pot, and crank the heat to medium plus the next notch – about 4 O’clock on the dial, or whatever is the right spot on your stove. And, yes, you may have to experiment a bit to find that spot. But at about $0.05 per batch, don’t worry if you have to ruin a couple to perfect this process!

Heat it up

Now listen carefully! No, not to me, to your pan! As soon as the first kernel goes Pop! (not sizzle, not pluhhh, not pfffssssd, but Pop), take the pan off the burner and time exactly 1 minute. Leave the heat up on the burner you came from; you’ll be going back. And Do Not open the lid of the pan. Just time off exactly 60 seconds.

Rest 1 minute

Now put the pot back on the heat. Shake, rattle and roll! Or shake, swirl and jiggle, at least. Doesn’t have to be fast, just steadily. Keep the stuff in your pan in gentle motion over the heat.

In another minute or so, you’ll hear the popping begin. And it will continue, increasing in fervor for a bit and then slowing, and then nearly stopping, and then, count to 7, no more.

Pop the lid, swirl the pan,
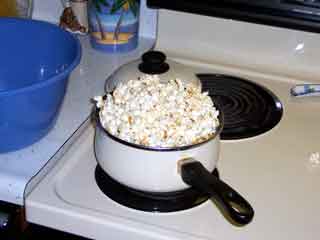
Popcorn popped

and dump the perfect popcorn into your popcorn bucket. Salt if you wish (I usually do – just table salt, the coarse stuff is too big for popcorn); a little on top, swirl and flip the bucket to distribute that shake, and then do another quick shake over ‘the new top.’

 Popcorn served

Shake, Eat, Enjoy . . .
Saturday, October 23, 2004

Technique: Dismantling the Maine Lobster

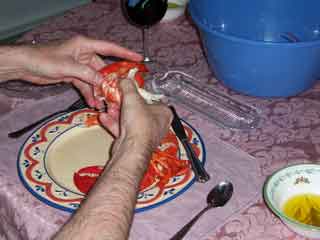
OK. You got it cooked, the lobster that is, poached, not boiled, right?! And there it is, on the plate. Now what coach? Well, you gotta take it apart. (As you do, give a moment’s thought to the first person on the planet who ever did the deed. What do you suppose inspired someone to dive to the ocean bottom, in freezing cold water, grab one of these monstrous looking creatures, cook it and tear it apart to eat? I do wonder . . .)

One item often missing from the lobster table, but a real necessity, is the ‘detritus bowl.’ That’s the elegant blue plastic bucket you’ll notice in the background of the photo. Be sure to have one available . . .

Lobster served

If your plate has hot water all over the bottom, tip it into the detritus bowl. And then hold your lobster head down over the bowl for a minute. When the water (if any) stops draining, you’re ready to take this thing apart.

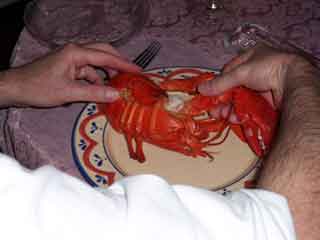
I like to start with the large claws. Turn your beast on its back.

Lobster on back

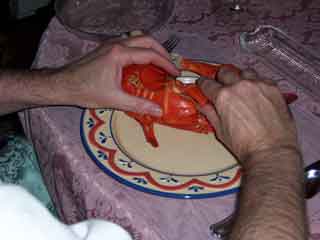
Hold the body, grab the large claw leg joint closest to the body and give it a twist.

Grip large claw

If it doesn’t come right off, give it a twist in the other direction, or twist back and forth a couple of times. It will come off.

 Remove large claw

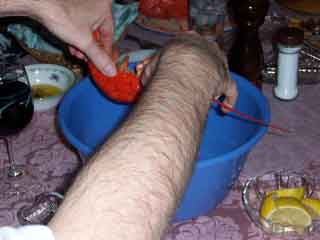
Hold it horizontally until you’re over the bowl and then hold it claw up for a bit to drain water. Do the same with the other one.

After the large claws are off, twist off each of the little claws. Again, just grab the joint closest to the body and give a twist (or three).

Remove small claws

The little ones seldom have much water in them, so you don’t need to take the time to drain them. Just pile the little guys next to the big ones.

Lobster claws removed

Now at this point, you have a difficult decision to make. Right now, all your lobster parts are still hot. If you dismantle the rest of the beast and remove all the meat before you start eating, everything will be cold when you get it in your mouth.

But if you remove meat and eat as you go along, you’ll be constantly switching gears between wrecking crew, surgeon and gastronome, your hands will be a mess throughout the entire meal, and by the time you get to the tail, it will probably still be cold.

Me, I always get all the meat on my plate first (and as fast as I am able) so I can concentrate on the eating part for the rest of the meal. You can make your own choice.

OK. All claws are off and the big ones have been partially drained. Some argue that since the tail will stay warm as long as it’s attached to the body, but the claws are already cooling off, that you should take the claws apart and get that meat soaking in the butter before tackling the tail. I prefer to take it all apart first.

So, over the bowl, grab the tail in one hand, the body in the other, do the old bend and twist a time or three.

Lobster remove tail

When the tail comes off, tip it to drain, and drop the body into the bowl.

Lobster drain tail

OK, OK, no hate mail, please. I know. There’s enough meat in the body to feed a family of four, or fourteen, depending on which old Yankee you listen to. I’m sure there is. I’ve never had the patience to dig it all out. If you do, feel free. But I’d recommend you save that task until you’ve finished eating the easy parts!

Now. Depending on the time of the year, the phase of the moon, the gender of your lobster, and probably nine other factors I know nothing about, you may, or may not, see some green ‘tamale’ and/or red ‘coral’ sticking out from the tail of your beast.

Lobster tamale and coral

Yes, they are both edible. And many people consider them great delicacies. I don’t like the way either one tastes, so I scrape them both off into the bowl.

Remove tamale and coral

Next, split the tail. Just grab it on both sides, hooking your thumbs on the fins, and bend outwards.

Split tail

Keep applying pressure until you feel the shell start to split. If the whole tail spilts, then you’re done. Otherwise, move your grip down a little toward the tail fins and bend again. By that time, the tail meat should be easily visible.

Lobster tail meat

Then, just grab on and tug. Boit. Out comes the entire lobster tail.

Tail meat removed

But you’re not done with that tail shell yet! See those little flipper fins at the end? Each one has a delicious little morsel of wondrously tender and tasty meat hidden inside. So bend off each one, drain it over the bowl, and put it on your plate.

Lobster tail fins removed

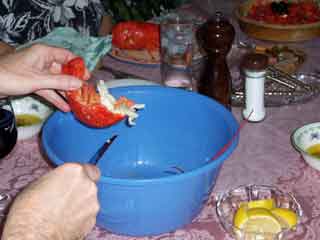
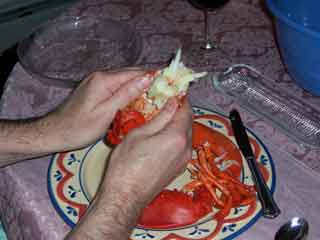
Now. To ‘undo’ a claw, hold it over the detritus bowl, claw down, and bend up the ‘thumb’ part – that’s the smaller of the two pincers. If necessary, give it a nudge side to side as well as up and down.

Bend up small pincer

When it snaps off, expect a gush of water to drain out of the leg and claw. Set the little one on your plate, and still over the detritus bowl, bend the rest of the claw free of the leg. Give both the claw and the leg a shake or two to get the last of the water out

Drain claw

At this point you may or may not need a claw cracker. Lobsters shed their shells when they outgrow them. The new shells are soft; the old shells are hard. If the shell is hard, you’ll hurt your hand and probably cut yourself trying to break the shell without a cracker. If the shell is soft, just grab the large claw and snap the pincer end off.

Snap off pincer

Because the lobster hasn’t had time to ‘grow into’ its new shell, the shell will separate easily from the meat. Drop the shell, tug the meat, and onto the plate.

Lobster claw meat removed

To get the meat out of the leg joints, you may want to use a ‘lobster pick.’ But if you don’t have one handy, fingers, fork tines, knife points, toothpicks, or . . . will do just as well. Dig in, one end then the other. Pull (gently, gently . . .), push, wiggle and jiggle.

Pick leg meat

The meat will plop onto your plate.

Leg meat removed

Do the other claw the same way, and you’re ready to eat.

Cut the meat and toss it into the butter bowl. Or cut it and leave it on your plate for individual bite dunking. Salt it (very, very lightly), douse it with lemon juice, dip it or drown it in butter, or olive oil, or flavored oil, or simply eat it as it is. You will enjoy . . .

Wednesday, October 20, 2004

Recipe: The Maine Lobster Dinner

This one is dedicated to Charlie and Mariann who were supposed to be here last month for personal instruction. It seems Mother Nature and Frances had other ideas. But for all of you who may have missed out, here's the simplest of New England meals, and, in the next post, my approach to dismantling the beasts at the table.

First, we should all understand that in most part of the US, when you order lobster at a restaurant, you don't get lobster. Instead, you get some form of crayfish. Yes, it may have lobster in its real local name (not the one on the menu: that will probably just say lobster and be followed by an obscene price), but Florida Lobster, Rock Lobster, Spiny Lobster, Southern Lobster, even (most of the time) Lobster Tail, they're all crawfish. (Check out: http://dictionary.reference.com/search?q=crayfish&r=67
for some definitions . . .)

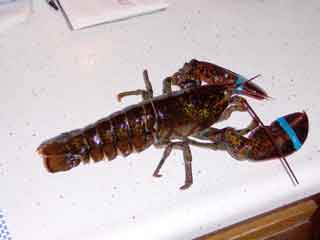
This is a lobster.

A real lobster

Everything else is not. (Which does not mean that any and/or all of those other creatures are not great eating. They are each wonderful in their own right! But please, do not call them lobsters . . .)

So here's what you need . . .
some crunchy French Bread (or your favorite 'bread with some character')
a big garden salad - lots of fresh grown tomatoes, greens and everything else
2 ears of fresh corn per person
1 lobster each
lemon wedges
and lots of butter (or your favorite butter substitute)

Here’s how you do it.
The usual phrase is ‘boiled Maine lobster.’ Please don’t boil your lobster! Like most seafood, lobster is a delicate meat. When cooked too hot or too long, it gets tough and loses flavor.

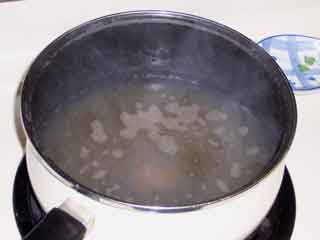
The ideal cooking method is steaming over hot rocks covered with seaweed on a sandy beach somewhere. But that’s a tad inconvenient in my kitchen . . . So we use a big bucket and poach the beasts. Get out your favorite big bucket (we use a 12 qt. stockpot or a canning pot), fill it about half full of water, toss in some seaweed if you have any, and bring the water to a full boil.

While the water is heating up, toss a stick or three of butter, or an appropriate quantity of your favorite butter substitute (as I’ve said before, we use Smart Balance), into a small skillet and put it over low heat. At the very least you want to melt the butter. At the most, you can do a full cheesecloth-strained clarification. What’s the difference? About 2 minutes and a piece of cheesecloth . . .

In either case, heat the butter gently until the milk solids settle out onto the bottom of the skillet, and whatever froth forms on the surface. Carefully (slowly) skim the frothy stuff off and throw it out. Let the milk solids ‘cook’ for a few more minutes in the butter and then just pour off the clear butter, leaving the solids in the pan. Or strain the butter through the cheesecloth.

At that point, I usually give the skillet a quick wipe, pour the butter back in and add a goodly slug of olive oil. I shoot for about 1/3 oil, 2/3 butter, but you can use whatever proportions you like, or skip the oil altogether, or hey, skip the butter altogether and just use olive oil! If you want, you can squeeze a fresh lemon or two into the butter/oil, but I prefer the sharp zing of lemon juice at the table, one bite at a time. You can leave the skillet on barely-there heat until it’s time to serve.

When your bucket of water is boiling, get your lobsters out of the fridge, gently roll them into the sink and snip the rubber bands on their claws. (I don’t know about you, but I prefer the flavor of lobster over that of boiled rubber . . .)

Cut off the rubber bands

When they’re all snipped, pick up the lobster body from behind the big claws and plunge the lobster head first into the boiling water. Get all the lobsters into the pot as quickly as you can so they’ll all be done at the same time.

Put the lid on the pot, turn the heat to medium low, and check the clock. In 18 minutes, you’ll be ready to eat.

Why 18? ‘Cause it works for me . . . Look, when you plunge the cold lobsters into that half pot of boiling water, you reduce the water temperature dramatically. It’s going to take a good 7 minutes to get back to a comfortable poaching temperature. And 10 – 11 minutes after that to poach a 1 – 3 lb. lobster is just about right. You could leave the heat on high to try to reduce the time a little, but then you’d ‘boil’ your lobster and ruin it. So be patient, cook slowly, and you’ll reap the reward.

Lobsters cooked

Besides you’ve still got corn to cook! So put about 2 inches of water in the bottom of your corn pot. You want to steam your corn, not boil it. Cover the pot and put it over high heat to bring it to a boil. When you’re about 6 or 7 minutes away from taking the lobsters out, put the corn in, cover the pan, and again, turn the heat down to medium low. Fresh corn on the cob is very delicate. Five minutes in the steam is plenty to cook it. When the time is up, turn off the heat, uncover the pan and just let the corn sit there while you get the lobsters out.

Then haul everything to the table and dine in glory!

Lobster served

Thursday, October 14, 2004

A Short break . . .

Yup. It’s been way too long since the last post. And it looks like it will be a little longer still. Houseguests are here until next week . . . See you then!

Friday, October 01, 2004

Tip: Use Wood Cutting Boards!

Your knives will love you for it, and last longer, too. Even inexpensive wood cutting boards can last a lifetime (well, a long time, anyway), and they may be more sanitary than the plastic ones anyway!

Ok, Ok, I know. All the photos so far show an acrylic board. What can I say? I hadn’t been following my own advice for the past few months, and my wooden boards were in a state of benign neglect when I started this adventure. I’m fixin’ it, I’m fixin’ it . . .

To insure that your wooden board will last a lifetime (or two), you'll need to prepare it properly, and care for it - but that's not hard to do. When you buy a new board, stop at your local pharmacy and pick up a pint of mineral oil.

Then, remember the old Yankee adage:

Oil your board
once a day for the first week
once a week for the first month
once a month for the first year
once a year forever after.

Personally, I try to oil my boards every few months, but if you do the first year properly, even just once a year will be enough thereafter. I have one small cutting board that I paid $3.95 for in a discount store about 25 years ago. It's got some dings and scratches, but I'd call it 'good as new.'

Oil your boards . . .

As for cleaning your cutting boards, the arguments continue. Do a google on ‘salmonella cutting board clean’ or the like and you’ll see what I mean. Or, for a pretty good summary, check out: Cutting through the cutting board brouhaha

I give my wood boards a thorough rinse under hot water after each use (particularly after mincing garlic or onion or chopping jalapenos or the like), and then scrub them dry with a paper towel or clean dishtowel. Every few uses, I’ll give them a good soaping scrub. And, I never cut meat on my wooden boards - for that job, I use plastic and run them through the dishwasher to clean up.

But if you can't resist the urge to soak your wooden boards in industrial strength disinfectant, regardless of the scientific data, then by all means, buy your mineral oil by the gallon and oil your boards at least weekly. You'll be amazed at the abuse a wooden board can survive with even just a little care.

Tuesday, September 28, 2004

Recipe: Butternut Squash

I hated squash growing up. But I was forced to eat it, at least at Thanksgiving and Christmas. It was always mashed to a fare-thee-well, and served without any seasoning (which, in part, explains my early penchant for over salting everything!) Somewhere in the mid-1970s, a butternut squash got left behind in my kitchen; I couldn't just throw it out, or let it rot, so . . .

here's what you'll need . . .
1 butternut squash
½ Tbsp. Butter (or more)
pinch of ground nutmeg
sprinkle of ground cinnamon
salt & freshly ground pepper

Here's how you do it.
Pre-heat your oven to 350° F.

Whack the bulbous end off the squash using your Chinese knife (or your Chef's knife, or a hatchet, or whatever . . .) If you aim properly, you'll end up with a solid stem-end of the squash, and the bulb end with all the seeds and pulp in it.

Butternut squash cut


Put the bulb end cut-side down and cut it in half. Use a teaspoon or tablespoon to scoop out all the pulp and seeds, scraping the surface until it's smooth. (If you're into making your own stock, toss the pulp and seeds into the stockpot, or you can bake the seeds for a crunchy snack, or you can just chuck 'em.) And, no, don't peel the squash!

 Butternut squash split

Now cube the squash (and trim off the hard brown root connection from the bottom of the bulb halves and the stem round from the top of the stem part). We like smallish cubes about ½ to 1" on a side, but feel free to make them larger if you like. They're going to be covered while they cook, so they'll steam thoroughly no matter what size you make them.

 Butternut squash cubed

Find a shallow baking dish that will hold the squash cubes in 1 or 2 layers (no more!) without peaking up over the edge of the dish (much). Depending on the level of your 'butter fear', either grease the baking dish with butter, or spread a few drops of olive oil in the bottom. Like most vegetables, the squash contains enough water to float an ark, but just in case, a little grease to keep anything from sticking to the dish is always a good idea.

Toss the squash cubes into the dish. Grind some Tellicherry across the top (add a pinch of salt, if you must). Sprinkle enough ground nutmeg over the surface so you can barely see it (nutmeg can become bitter when it cooks, so you want enough to flavor the dish, but not so much that you end up with a bitter taste), and then sprinkle a goodly dusting of cinnamon over everything. Dot the top of the dish with pats or daubs of butter or a goodly blob of butter substitute. Cover the baking dish or seal it with a tent of aluminum foil (just a little space above the squash), and put it in the oven for 25 - 35 minutes (longer for mushier, shorter for sturdier texture).

 Butternut squash ready to cook

Serve with beef, chicken, turkey, pork, swordfish, or . . .

Thursday, September 23, 2004

Recipe: That Shrimpy thing you do . . .

The idea was to do shrimp on pasta, some kind of garlicky lemony scampi like dish. But scampis tend to overpower the shrimp – you get shrimp texture but not much shrimp flavor. Shrimp cocktail gives you shrimp flavor, which you then enhance with a glob of cocktail sauce. So how to get the lemony garlicky thing with the full flavor of just poached shrimp?

The secret, of course, is: the sauce.

Sure. Poach the shrimp. Make a sauce. Toss pasta with sauce, add shrimp to top and serve. Simple, right? Not in my kitchen! . . .

Here’s what you’ll need . . .

1 lb. Poached shrimp
2, 4, 6, 23 . . . garlic cloves
½ to 1 onion
½ green bell pepper
½ red bell pepper
¼ italian pepper (they look like pepperoncini on steroids)
2 – 4 mushrooms
1 – 2 tomatoes
8 – 12 black olives
zucchini (at least ½ of one, more if you like)
summer squash (as above with the zuke)
juice from ½ lemon
juice from ½ limes
½ tsp. sriracha (SE Asian chile sauce)
1 – 3 tsp. fish sauce (Tiparos)
sesame oil
olive oil
White wine
½ tsp. ground cumin
freshly ground Tellicherry (black pepper)
‘italian seasonings’
cilantro
linguine, fettuccini, vermicelli, and/or angel hair

Gather all the ingredients before you start. Poach the shrimp as described in the Poached Shrimp(s) post from last week.

Shrimp thang ingredients

While your shrimp shells are cooking, chop up the veggies for the sauce (garlic, onions, tomatoes, peppers, and black olives).

When it comes time to poach the shrimp, stop whatever else you’re doing. Pay attention to the shrimp!

Ok. Set them aside and get some water going to boil your pasta.

Poached shrimp

While your water is heating up, chop up the rest of the veggies. I like to use pretty big chunks so they sit in the sauce instead of becoming part of it. The mushrooms can go either way. Some times I’ll whack them up into little bits and let them be sauce; sometimes, big chunks and they’re vegetables; and sometimes I can’t decide so they just get sliced!

Shrimp thang ingredients all

Cook your pasta. Leave it a little more al dente than you usually like it. It’s going to cook some more in the sauce – not much, but some, and you want the pasta in this dish to have some character, not to be all mushy.

So, while your pasta is cooking, mix up a marinade for your shrimp. I go back and forth about how much flavor to put on the shrimp while they sit and how much to put into the sauce as it cooks. At a minimum, give your shrimp a light coat of sesame oil and let ‘em sit in the lemon and lime juice. Next time you do this meal, try adding another ingredient (or 12) and see what happens.

By now, your pasta is certainly cooked. Before you dump it into the colander, though, pour off a couple of cups of the pasta water into a bowl or measuring cup. Like the shrimp broth, you’ll be adding (at least some of) this liquid to the sauce. Then, drain the pasta thoroughly, dump it back in the pot, give it a goodly squirt of sesame oil, and dig your hands in there! The idea is to coat every strand with oil.

Shrimp thang cooked pasta

On to the sauce! Crank up the skillet, pour in some olive oil (at least a couple of tablespoons – it’s an ingredient as well as the cooking oil), swirl once or twice until, as they say, the oil comes to fragrance. Turns out, ‘they’re’ right. It actually does give off a beautiful fresh fragrance when it gets to just the right temperature.

And that’s just the moment to toss in the onions. Swirl them around, turn the heat back down to something civilized (about where you’d put the stove for a hearty simmer), and sauté the onions for about 2 minutes. (Sautee is a French verb, to jump. Don’t take it literally here. If your onion is jumping out of the pan, the stove is too hot!)

Add in some of the peppers, and give them about two minutes also. Now the garlic and the rest of the peppers. About a minute and toss in the mushrooms. Another minute or three and finally, the tomatoes and black olives. As soon as the temperature comes back up, but before any jumping starts, pour in a goodly slug of white wine. There are flavors in those tomatoes that will only come out in the presence of alcohol. So give ‘em a little (if you can – if you can’t, Don’t! Your dish will still taste great!)

So Ok. After about 5 more minutes, the mushrooms will have given up their juices, the tomatoes will be breaking down, the garlic will be filling your nostrils, it’s time to add some liquid. Start with every last drop of your shrimp broth. Then add pasta water to bring the liquid level to within about ½ inch of the top of the skillet. And stir it all around.

If you don’t have enough pasta water to get it that high, just add some plain water and or some more white wine. The measurements here are not critical. You just want a goodly bucketful so you can cook it down to about half that much. Should take about 10 minutes to reduce the volume by half.

Shrimp thang sauce

And during that time, add in whatever you haven’t added to the shrimp marinade. Start with the sriracha. That way, the heat will get gently distributed throughout the sauce as it reduces.

Then add the herbs and spices. Use whatever proportions you like, but some oregano and basil for sure, maybe some savory if you’ve got it, or even a tiny amount of rosemary and/or thyme if you don’t have any savory. As always, if you’ve got fresh herbs, use them; if not, the dried versions will be fine. And remember to crush dried herbs in the palm of your hand before tossing them in – it really does release a lot more flavor.

As you near the ‘right’ amount of sauce (about half the height of the pan), add the fish sauce (it’s salty and you don’t want to concentrate the salt – you want to season with it).

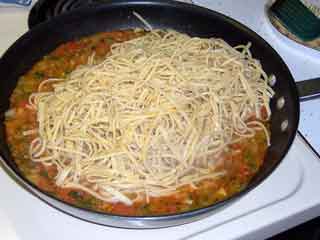
Finally, pour in the pasta and turn, stir, roll, separate, and otherwise mix it all about. As you did with the oil, try to get every strand individually coated with your incredible sauce. By the time you get this accomplished, at least 5 minutes will have passed, and it’s time to add the shrimp and every last drop of whatever marinade you’ve had them sitting in!

shrimp thang add pasta

Stir them in gently, turning things over and under for about another 2 or 3 minutes. By then, the marinade flavors will have blended, the shrimp will have warmed, the sauce will have perfected, and it’s time to serve. Sprinkle some (more?) cilantro over the top of each plate, and . . .

Shrimp thang in skillet

Eat!!

Shriimp thang served

phew . . .

Saturday, September 18, 2004

Recipe/Ingredient: Poached Shrimp(s)

Around here, ‘fresh shrimp’ means the little Maine ‘popcorn’ shrimp that show up for a couple of weeks each year. The rest of the time, our shrimp come frozen, mostly from SE Asia. Even when you buy them out of the fresh fish case, they arrived frozen. And you know what? They’re still great. Especially since somebody figured out how to de-vein the little buggers before freezing them!

But shrimp have such a delicate flavor, and they cook so quickly that their taste often just disappears if they’re cooked with anything else. So when we do a shrimp dish, I’ll almost always poach the shrimp separately and add them to the rest of the dish at the last minute.

Now you could just boil some water and toss the shrimp in, but as long as you’re in the kitchen anyway . . .

Collect 1 lb. of uncooked shrimp, shell on.

Peel your shrimp

Peeled shrimp

and put all the peels in a saucepan. Add a few cups of water. And, hmmmm, how about a few whole black peppercorns? Yeah, that’s a good idea. Say, what about that coriander seed and . . .

Well, mix up your own favorites – just please stay away from all those pre-packaged ‘shrimp boil’ or ‘crab boil’ kinda things you find in the store. Make your own. It’s easy, and you get to control just how it tastes.

Last night, mine consisted of:

8 black peppercorns
1/3 tsp. whole coriander seed
¼ tsp. whole mustard seed
¼ tsp. dried dill weed
¼ tsp. dried savory leaves (or a little thyme and a couple of rosemary leaves if you don’t have savory)
1/3 tsp. coarse kosher salt
4 small bay leaves, broken into pieces
stalks from 4 sprigs of fresh parsley
1 fresh basil leaf

and a quart of water in a covered 3 qt. saucepan.

Bring it all up to a boil. Now be careful. It will froth up and boil over. I guarantee it . . . So be ready. Don’t go wandering off to check the score of the ballgame. Stand there. Wait. On my stove, over high heat, it takes a pot of liquid about 7 minutes to come to a boil. For this stuff, I start lifting the lid after about 5 minutes. And keep checking every 15 – 30 seconds. ‘Cause when it starts to go, it will overflow in about 3 seconds. As soon as you get a good head of froth, get it off the heat, stir the pot, turn the heat to low, stir again, re-cover, and put it back on the burner.

Shrimp broth cookin’

Let it bubble gently for a half hour or so. Now you can go check the score of that game . . .
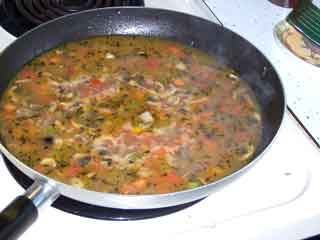
When you come back, strain the liquid. Don’t spill a drop! Those shrimp shells and the herbs and spices have given their all for your poaching liquid. Don’t waste it!

Put the liquid back in the saucepan and put it back over medium high heat to reduce. Leave the lid cracked, or half on or something. You don’t want this to be a frothy boil, but a good rolling simmer will be perfect. You do want about half the liquid to evaporate. So get an eyeball on the pot when you start. Guesstimate half that height. And do whatever it is you do while you wait for things to get cooked . . .
Shrimp broth reduced


OK. Ya got two cups left? Now’s the time. Crank the heat to high. Cover the pan. Count to 32 (or whatever your favorite magic number might be today). Uncover, dump the peeled shrimp in, swirl with a spoon, cover, and turn off the heat. Check the time! In exactly 5 minutes your shrimp will be ready. Not 4, not 6, 5. Exactly.

Poached shrimp


So, at the end of 5 minutes, strain the liquid into a bowl, measuring cup, bucket, whatever, and dump the perfectly poached shrimp onto a plate. SAVE that liquid! If you can’t use it tonight, put it in a glass jar, seal it tight (while it’s still hot!) and park it in the fridge. That’s shrimp broth. It’s worth millions! Save it. Use it for soup(s), sauce(s), gravy(ies), ice cream topping, skin conditioner, I don’t know. But it’s good!

As for the shrimp, let them sit for at least 5 minutes. Then do something fun with them . . .
Poached shrimp finishing

Friday, September 17, 2004

And on some days . . .

The next right thing is simply to pay the pieman!

Pizza Pie, ready-to-eat!